Archive for the ‘Beer’ Category

Ever wondered why plumbers are paid so much?

Friday, November 25th, 2022
Standard home brewing conditions

It’s a difficult job that combines working in horrible conditions with the need for multiple skill sets. But the main reason plumbers are well paid is because they know the arcane secrets of plumbing fittings. It is dangerous, forbidden knowledge, some of which I am about to share. Strap in. We are going through the looking glass…

Update: Thanks to all the good people on Hacker News for their input, from which I’ve learned a lot. I should stress that any following advice is not from a professional plumber and is purely from my own experience as an idiot making a low pressure beer handling system. It should not be read as the proper way to do anything, especially if you are working on pressurised systems and definitely totally 100% not with gas fittings. Get someone in to do that, you lunatic. Seriously. Don’t mess with gas.

This is posted from the perspective of a home brewer, so it’s just a small subset of the world of plumbing fittings – we use mainly stainless steel fittings for sanitary reasons.

The first thing to remember is this:

Nothing makes sense

In the UK, stainless steel fittings usually screw into each other, using a standard thread called “BSP” – British Standard Pipe thread. You will see 1/4 BSP, 1/2 BSP etc. A common size is 1/2 BSP – the “1/2″ is, of course 1/2 an inch. So which part of the thread is 1/2 an inch? None of it. So it’s the diameter of the pipe? Nope. The pipe’s diameter is about 3/4”. The 1/2″ refers to the inside diameter of some random cast iron pipe the fittings were originally made for. This type of pipe has probably not been used since 1834 when Isambard Kingdom Brunel rigged his privy to flush as a birthday present to his wife. Nothing in a 1/2″ BSP fitting measures half an inch – not even the inside diameter of the pipe, because modern pipes have thinner walls.

So to recap, the “BSP” measurement is a standard for the outside pipe diameter and threads and gets its number from the inside diameter of a pipe that doesn’t exist. I guess we should just be grateful that a larger number means a larger pipe – I’m looking at you, Standard Wire Gauge.

But let’s not get downhearted, it is a standard after all. At least any 1/2 BSP thread fits any other 1/2 BSP thread. It must do, right? Oh dear god no. There are two types of BSP thread and the first fits in the second but the second doesn’t fit in the first.
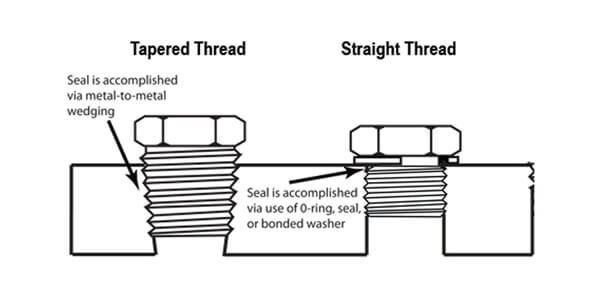
You can have either a tapered thread or straight thread on either the female or the male part of the fitting. Note that the picture shows the straight thread having an O ring. Nah. That’s way too easy, so we don’t do that – more later. Anyway, obviously a tapered male in a tapered female is fine, and you get a nice tight fit. Now imagine putting a tapered male in a straight female. That too is fine; the bottom few threads don’t fit properly, but the top ones do and there is enough contact to make a seal. But putting a straight male in a tapered female does not work. It will leak and you will be sad. The thread of the straight male hits the bottom of the tapered thread while the top is loose, so there is hardly any contact area.

So you need to make sure you are getting your tapers and straights correct, and naturally no one goes to any effort to tell you what you are buying. In theory “BSPT” means BSP Tapered and “BSPP” means BSP Parallel but hardly anyone uses these terms because that would make it too easy. Everyone just calls them “BSP” so there is no way to know if they are parallel or tapered, unless it’s actually stated somewhere in the description, which it usually isn’t. Some people even call straight ones “BSPT” because they think the “T” stands for “thread”. Marvellous. That really fucking helps, thanks.

Given that using a tapered female fitting means 50% of the male fittings don’t actually fit, then they must be rare, right? Nope. They are everywhere and you have to use your telekinesis because no retailer ever bloody tells you if they are tapered or straight. You might be thinking “what is the point in making tapered female fittings if you can fit both straight and tapered males in straight ones, which are easier to make?” The answer is simple – they hate you and they hate me. Or possibly tighter coupling or something, but I suspect it’s just plain spite. When buying male fittings, it’s best to always get tapered ones so they fit in either. I mean why do they even make straight ones? The only possible reason is malice. Or they are cheaper. It’s malice though.

It would be useful if manufacturers indicated the fitting type with some sort of mark, so of course they don’t. You have to squint at it and guess.

This is not a problem for plumbers, who have to have every type of fitting on the planet rattling around in the back of the van. If they buy 50 flanged wibblers with tapered threads by mistake, they can just buy 50 straight ones from somewhere else and they will all be used eventually. You and I end up with a box full of unwanted fittings, but it’s useful to have spares, I suppose.

There are other types of fitting – “G” (as in G 1/2) and “NPT” (as in 1/2 NPT) . You might see “G 1/2” used with metric push-fit connectors. Yeah, that’s BSP as well. G 1/2 is 1/2 BSP because it’s not confusing enough to just have one name for a standard that doesn’t always fit itself. At least they kept the numerical part of the name – which doesn’t actually match any dimension of the fitting,

Then there’s NPT. NPT threads are different from BSP, which actually comes as something of a relief at this point. Naturally, they aren’t different enough to be immediately obvious because that would spoil the fun. Oh yes, NPT is identical to BSP, with the only difference being angle of the valleys in the thread and that the threads are pointed. This means that despite looking the same, NPT is not compatible with BSP. Because fuck you, that’s why. Luckily, you don’t see many NPT threaded fittings in the UK and they are only sold by genuinely evil retailers.

Let’s dip briefly into the sane world of metric fittings. Ahhh… 15mm compression fittings make sense, with their sensible millimetres sensibly representing the actual diameter of the pipe. Except that… Sorry… The thread on a METRIC 15mm compression fitting is not metric, it’s 1/2 BSPP! You cannot escape the lunacy in a metric lifeboat. Actually, best not to complain because it’s quite useful that you can do things like bodge cheapo 15mm isolating valves into your 1/2 BSP pipework.

Unless it’s tapered.

Using the bloody things

Given the ubiquity of BSP threads in stainless fittings, you might think there is some sort of advantage in using this utterly psychotic standard. It must give nice leak-tight results and be easy to use? No. It’ll drip like a fucked fridge and you don’t know what angle the joint will be when it’s tightened up. On the plus side, you get a genuine feeling of achievement when you get a nice looking leak-free system. On the minus side, everything else.

Remember that picture up there showing tapered and straight threads? Remember the one on the right says it uses an O-ring? Bullshit. It’s a fairy story that plumbers tell their children (probably). In the real world, there is no flange on your typical straight fitting. Look.

A 90 degree 1/2 BSP coupling, yesterday

Where does the O-ring go, eh? Eh? EH??? No, we use PTFE tape, and it sucks. For what it’s worth, I tightly wrap the tape 10 times round the male thread and get an enraged mountain gorilla to tighten it up. Or a bloody great spanner if there are no nearby gorillas. This means, of course that it ends up with the other end pointing in a random direction. If you want your pipework to look like a Windows XP screensaver, then that’s fine. For those of us with an ounce of pride left and some vestigial will to live, there are 2 choices:

  1. Before going full gorilla on the joint, there is a small window of tightness where the thread hasn’t bottomed out, but it will still be leak proof. If your desired angle is in that window, then the gods of plumbing have smiled on you this day. Good luck finding it. Plumbers, of course, have an extra sense to us mortals and can find it easily.
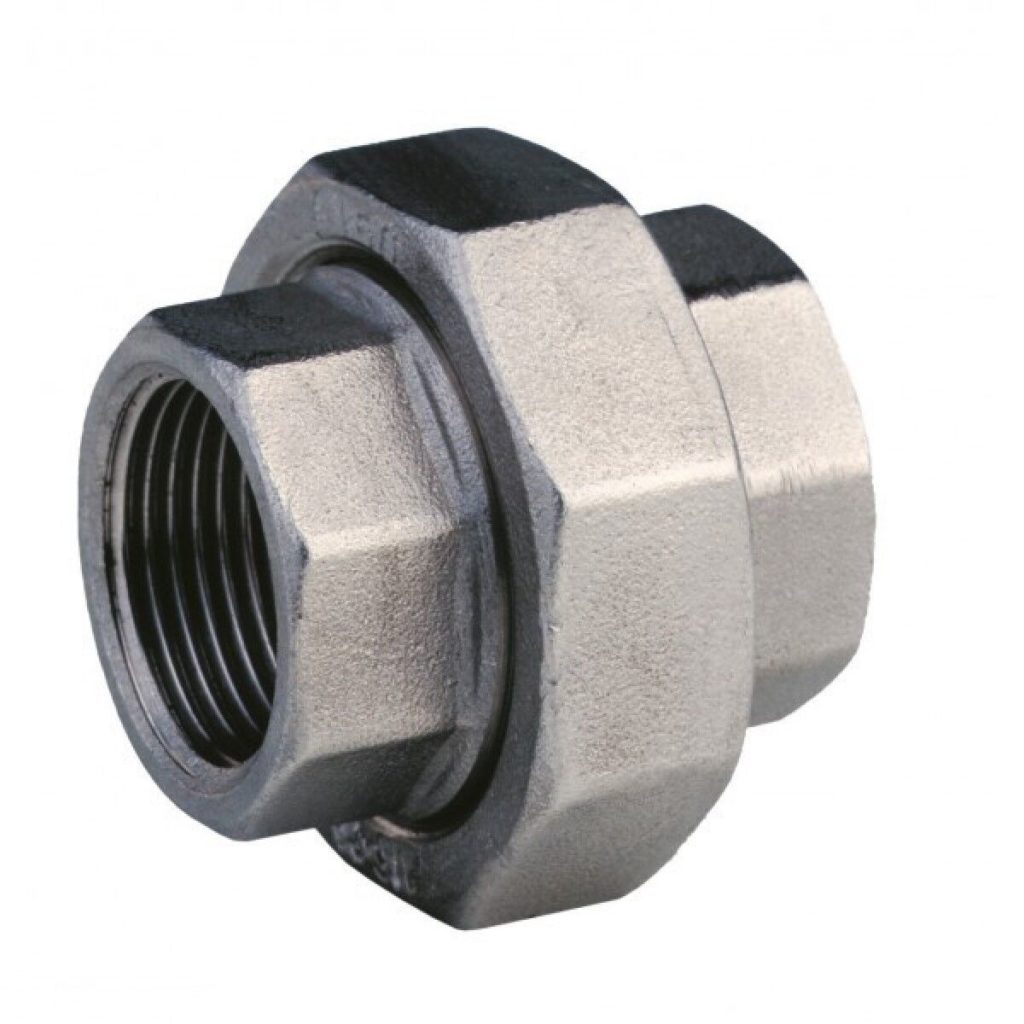
  2. You use a union. This lets you connect two BSP fittings without screwing them together. Each thread is screwed in to a round flange and the two flanges push together with a PTFE washer between them. A large nut clamps the two halves tightly.
The state of the union.

This is especially useful when you are assembling the final mess.

I hope this is useful to you and good luck in your plumbing. Final comment: Don’t bother using “Dope” or “Rectorseal” or whatever the name of the compound that is supposed to magically produce a leak-free result in seconds. Just buy cheap PTFE tape, and lots and lots of it. 12 rolls might see you through a medium sized project.

Conclusion.

Fucking hell.

Chill out man

Thursday, November 24th, 2022

The journey of creating a proper brewing setup begins (and continues) with various pipes popping off and blasting your face with water, cartoon-style, before you eventually end up with something that works and doesn’t fill your garage with water.

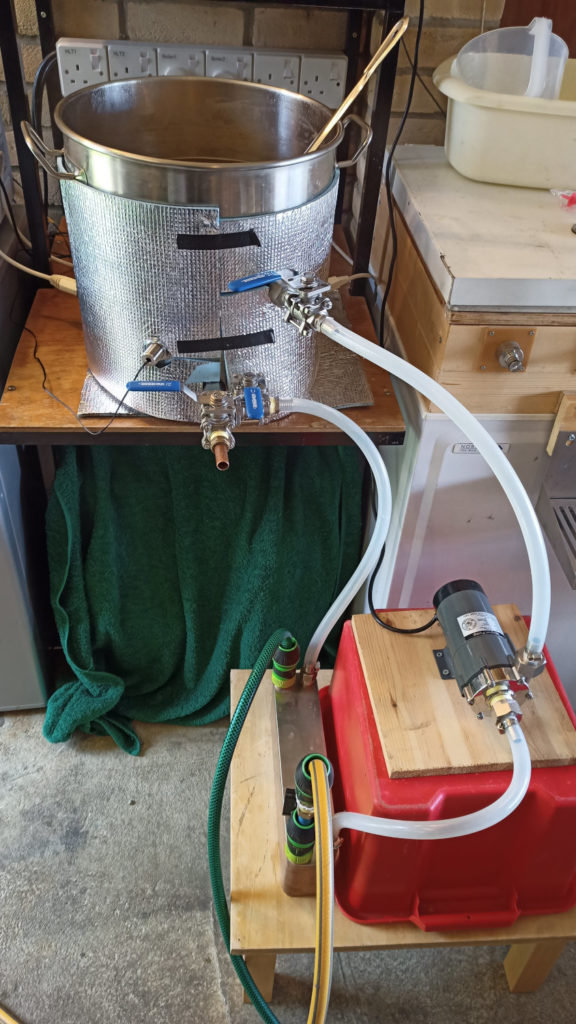
The horrible mess in that picture is what I actually tried to use for my first brew with a plate chiller. It did such a terrible job that it prompted me to spend 3 months doing it properly. If your set up looks anything like that you might want to read on.

The setup shown here is pretty typical from what I’ve seen on YT videos. It takes the wort from the outlet at the bottom, runs it through the chiller, on to the pump, and then out to the whirlpool outlet at the top. Other than just looking plain nasty, there are a number of things wrong with it:

  • Each silicon pipe held on with jubilee clip is a time bomb, waiting for you to forget to tighten it up.
  • The chiller is sitting on its back, which is inefficient, and means you end up with a chiller full of wort at the end of the brew.
  • The pump is higher than the chiller. It’s not self-priming so you have to fill up the chiller first before you can start pumping.
  • Bump into the table and all that stuff goes on the floor, probably pulling off a pipe or two before putting a dent in your chiller.
  • You have to disconnect and reattach pipes when you want to change the configuration, like if you want to pump out to a conical fermenter. Each disconnect is another splash of wort on the floor. Forget to turn a tap off first and it’s a splash and a gush.
  • Cleaning it will be a pain because of all those silicon pipes flobbling everywhere. Poke them in a bucket to circulate cleaning solution and as soon as your back is turned at least one will flibbit out and start spraying everywhere.
  • “Flobbling” and “flibbit” are apparently already words in the Urban Dictionary with utterly disgusting meanings.

So, enough wibbling, here is my solution:

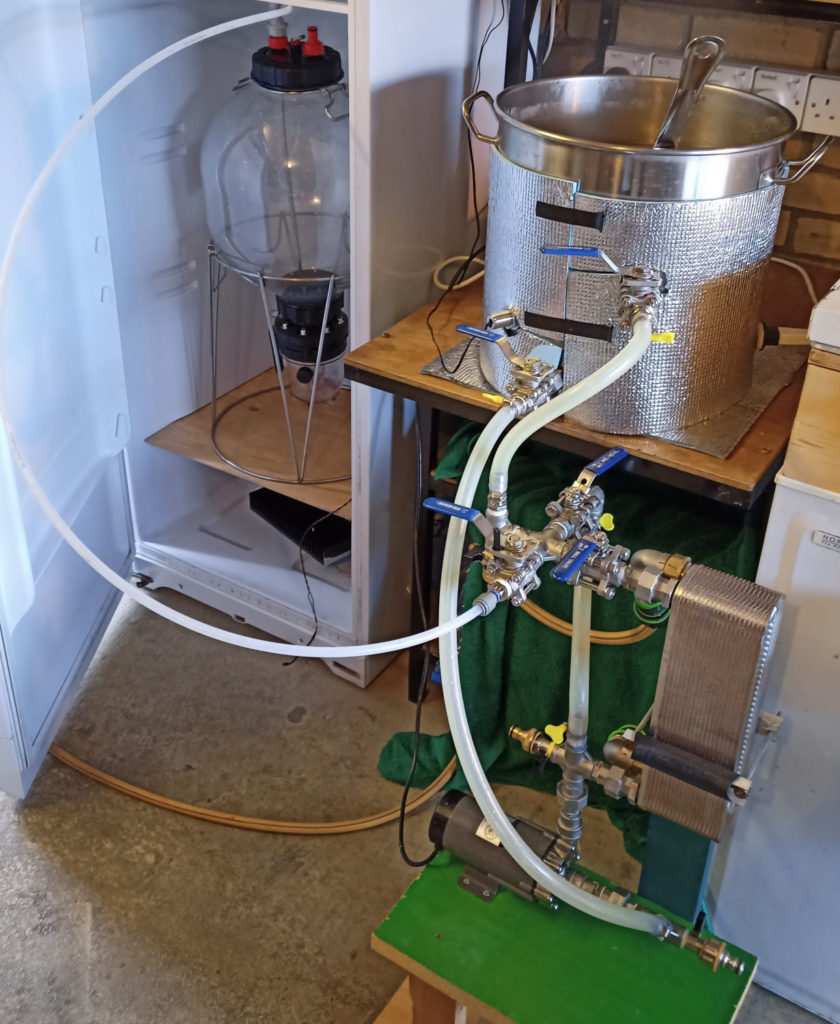
The Desplashinator 3000000

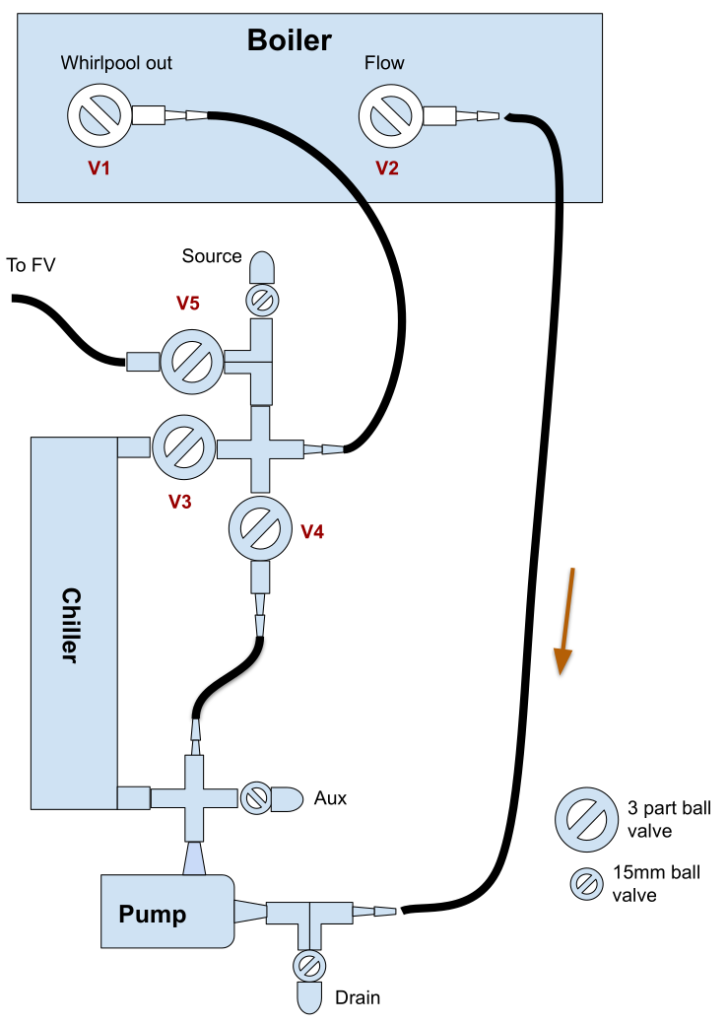
If you are thinking “that still looks pretty shit”, then you would be right, but it works better than it looks. From whirlpool to chilling to pumping out to cleaning, you don’t need to keep disconnecting stuff, thanks to all those valves. This is a diagram of what it is:

More valves than a 1945 radio

Before we get into how it works, let’s talk valves. It uses two different types: expensive 3 part ball valves and cheap as chips 15mm compression fitting valves. Did you know that the thread on a 15mm compression fitting is 1/2 BSP? It fits into a stainless 1/2 BSP female thread (as long as it’s not tapered), and that can lead to all sorts of fun and bodgery, as long as you use enough PTFE tape. I might do a separate post on plumbing fittings because they are a nightmare of unexpected incompatibility and unexpected compatibility.

Anyway, basically – expensive 3 part fittings are for passing wort through so they can be disassembled, and cheapo 15mm ball valves are for flushing with water and cleaning. Wort never goes through the 15mm ones, so they don’t need to be taken apart when you do a deep clean. Almost all the other parts are stainless 1/2 BSP fittings, which aren’t cheap but are pretty bullet proof.

Other features are:

  • The pump is at the bottom for easier priming.
  • The chiller is mounted vertically for more efficiency and easier draining.
  • Draining and cleaning ports have Hozelock connectors on them for cheap and easy connecting to hosepipes.
  • It’s all mounted on a sturdy wooden frame so bits don’t fall over.
  • There is a dedicated line to the FV so no fiddling with pipes. It’s essentially a sealed system to stop contamination.
  • You can whirlpool without the chiller being inline, so it doesn’t get clogged up with bits of hops before the hop cone forms.

How to use

So your boil is going to finish soon. First thing is to sterilise the equipment by running the boiling wort through it. Don’t start the cooling water yet. Open V1, V2 and V4 and wait for the pump to fill up and turn it on. You can speed up the process by pulsing the pump to shake the bubbles out.

Leave it running for a minute or two to get the hops whirlpooled towards the centre of the boiler. Then slowly open up V3 to start running the wort through the chiller. Do it slowly because it’s full of air and you’ll get big bloikking bubbles in your boiling wort. When the bubbles have stopped close V4 so it’s just circulating through the chiller.

Give it a few more minutes and then turn on the cooling water. Start off with a high flow rate and turn it down as the wort cools.

When you are down to temperature, close V1 and open V5 and pump her out! You will end up with some wort left in the chiller and pump but it’s only a few 100 ml, so I don’t worry about it.

How to clean

The Desplashinator 3000000 makes cleaning fun! If you are weird. I find it fun and I’m pretty weird. Just connect a hose to the drain valve connector, then open up all the 3 piece valves and the drain valve to empty the system – I empty it down a drain in the floor. It has to be lower than the system, obviously.

Stick a hosepipe connected to mains water on the source valve connector, close V1, V2, V3, and V5 and leave V4 open. This flushes the pump out backwards to get rid of bits of hop that might have caught in it. Then close V4 and open V3 to flush the chiller out backwards. You could probably do away with the “Aux” valve and connector because I never use it.

Clean out the boiler, put 5 litres or so of cleaner in it and reconnect it back to the chiller system. Then leave it circulating for a while before flushing with clean water. You can fill up the boiler through the source valve and V1 and flush with that out of the drain valve.

Conclusion

This is so much better than having it on a table and connecting everything with silicon tubing. It was a lot of effort to build, but totally worth it.

Next up: instructions for how to build one.

Abusing Public WiFi Access Point Protocols for Fun and Beer Measurement (Raspberry Pi)

Tuesday, June 9th, 2020

This is a little sub-project of what I’ve been working on recently – a hideously over-engineered Raspberry Pi-based system to measure the amount of beer left in the kegs in my keezer.

Normally I would simply set up a web server on the Pi and have it on the home network, so I could see the levels remotely. The problem is that the routers are all inside the house and the Pi is in the garage, invisible to them all thanks to the 2 external walls between them. I needed some way to read out the beer levels on my phone – after all, walking up to something and looking at the level gauge is so last millennium.

So – Bluetooth or some sort of ad-hoc Wifi thing? I like to re-use stuff I’ve got lying around in drawers, so the solution seemed to be an old WiFi dongle that was gathering dust. And Bluetooth is awful. Setting up a Pi as an access point is fairly well covered on the internets, but this is a bit different in that we don’t want to forward traffic onto our network like an access point – not that it could connect anyway, being out of range. I also didn’t want to install a web server on the Pi. It’s only a Pi 1 model B, so sticking Apache and PHP on it might be asking a bit much – especially when you can do it all with one command and a small BASH script.

So the cunning plan was to take advantage of a feature of public access points – the ones that show you a registration page for you to fill in with fake info.

When you connect to a public WiFi hotspot your device tries to load a page on the internet using non-SSL http. It might be any page (captive.apple.com/ seems to be popular), but it will be a web page that the device knows should exist and if it loads, your device knows the internet is working.

A public access point intercepts the page request and, rather than forwarding it, sends a 30x redirect HTTP response back to the device – basically hijacking the request and spoofing the reply. Your device then loads up the page it has been redirected to and displays it as a sign-in page.

It is this mechanism that I used to show the keg levels on any phone, just by connecting to the Wifi. This is how to do it if you want to do something similar. I’m assuming you SSH on to a Pi connected with an ethernet cable to your network, and you have a Wifi dongle hanging out of its USB port. In all likelihood they will be eth0 and wlan0 respectively, so I’ll use them.

wlan0 is going to use a different range of IP addresses from the ones used by eth0, so edit /etc/dhcpcd.conf to manually assign an IP address to the wlan0 interface. Add this at the bottom (comment out any existing definition for wlan0):

interface wlan0
    static ip_address=192.168.4.1/24
    nohook wpa_supplicant

Next we need to install hostapd to run the hotspot and dnsmasq to sort out assigning IP addresses to devices that connect.

sudo apt-get install hostapd
sudo apt-get install dnsmasq
sudo systemctl stop hostapd
sudo systemctl stop dnsmasq

The second two commands disable the services we just installed so we can edit config files before starting them again.

Create the file /etc/dnsmasq.conf and put this in it:

interface=wlan0      # Usually wlan0
dhcp-range=192.168.4.2,192.168.4.20,255.255.255.0,24h
address=/#/192.168.4.1

This tells dnsmasq to assign the range 192.168.4.2 – 192.168.4.20 with a netmask of 255.255.255.0 and a lease time of 24 hours. The third line tells it to return the server address for all domain lookups that aren’t in /etc/hosts, i.e. all of them. When dnsmasq restarts it will look at this file and load up the config information.

Now to set up hostapd. Create /etc/hostapd/hostapd.conf and put this in it:

interface=wlan0
driver=nl80211
ssid=Your SSID here
hw_mode=g
channel=7
wmm_enabled=0
macaddr_acl=0
ignore_broadcast_ssid=0

It’s pretty obvious what is happening there, other than some of the technical bits; wmm_enabled is something to do with packets (no idea what, though), macaddr_acl tells it to whitelist all connections and ignore_broadcast_ssid tells it to broadcast the SSID – set it to 1 to hide it. There is no WPA password or setup, obviously. Change the SSID to something hilarious.

Now you need to tell hostapd where to find the config file when it starts. Edit /etc/default/hostapd and add (or uncomment and edit) the line:

DAEMON_CONF="/etc/hostapd/hostapd.conf"

We have now set up our access point. Start dnsmasq and hostapd again:

sudo systemctl start hostapd
sudo systemctl start dnsmasq

If there are no errors, your AP should show up in the list of APs on your phone, laptop etc. Try connecting to it – it should connect but you won’t be able to see the internet because there is no forwarding. One thing you can still do however, is connect to SSH on the Pi. You really don’t want any ports other than 80 visible from an unsecured AP. We’ll use iptables to set up a firewall and do the test page hijacking.

sudo iptables -A INPUT -p tcp -i wlan0 --dport 80 -j ACCEPT
sudo iptables -A INPUT -p tcp -i wlan0 --dport 53 -j ACCEPT
sudo iptables -A INPUT -p tcp -i wlan0 -j DROP
sudo iptables -t nat -A PREROUTING -p tcp -i wlan0 --dport 80 -j DNAT --to-destination 192.168.4.1:80

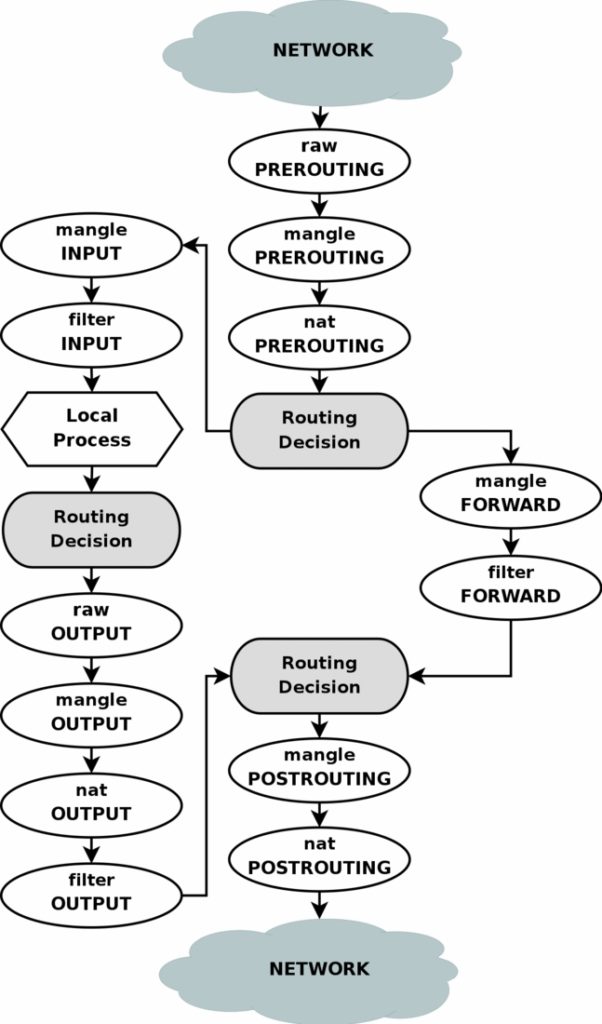
The first two tell iptables to allow through connections on port 80 (HTTP) and 53 (DNS), the second tells iptables to drop all other TCP connections from wlan0. The third redirects any connection with a destination port 80 (regardless of the IP address) to the Pi at IP address 192.168.4.1, port 80, for our server to handle. If you are a bit confused about how iptables work, this flowchart will either clear things up or make it more confusing. Basically there are 4 tables – filter (default if no -t switch), nat, mangle and raw which each contain “chains” such as INPUT which are the instructions on how to route traffic. It’s a vast subject and I learned just enough to work out the 3 lines above. There are other guides that go into more details.

One thing to do at this point is make it so that the iptables configuration is not lost when the system is rebooted. This command saves it to a file:

sudo iptables-save >/etc/iptables.ipv4.nat

To reload the configuration on boot put this in /etc/rc.local

iptables-restore < /etc/iptables.ipv4.nat

So, moving on to the web server. I’m using socat and a bash script. socat is one of those amazing Linux tools that is impossible to explain to a layperson. “What it does is, it takes data from one place and puts it in another but it’s more complicated than that…” and so on. Best just to tell them it’s the computer equivalent of magic, before their eyes glaze over and they start thinking about feigning an illness in order to escape. We are going to use it to pipe data from an internet port to a script and back again. Incoming text from port 80 is sent to the script on stdin and anything written to stdout gets sent back to the port. It’s easy enough to set up with this command:

sudo socat TCP4-LISTEN:80,reuseaddr,fork EXEC:"/home/your_path_here/server.sh >/dev/null" 2>/dev/null &

Obviously change “your_path_here” to where you are doing all this stuff and put this line in /etc/rc.local if you want it to start automatically on boot. The command tells socat to listen on port 80 and then fork off the script when there is a connection. The script referred to as /home/your_path_here/server.sh is this:

#!/bin/bash

PAGE_NAME="kegs"
FOUND_URL="http://1.1.1.1/$PAGE_NAME"

request=""
while read -r  -t 5 line; do
  if [[ ! -z "${line:-}" && $line == *[^[:cntrl:]]* ]]; then
    if [[ ${line:0:4} == "GET " ]]; then
      request=$(expr "$line" : 'GET /\(.*\) HTTP.*')
    fi
  else
    break
  fi
done

if [[ "$request" == "$PAGE_NAME" ]]; then
  printf "HTTP/1.1 200 OK\n"
  printf "Content-Type: text/html\n\n"
  cat index.html	# Show this as a registration page.
else
  printf "HTTP/1.1 302 Found\n"
  printf "Location: $FOUND_URL\n"
  printf "Content-Type: text/html\n\n"
  printf "Redirect to <a href=\"$FOUND_URL\">$FOUND_URL</a>\n"
fi

That’s pretty dinky for a web server, huh? Don’t forget to change permissions of server.sh with chmod 755 server.sh. Rename PAGE_NAME and FOUND_URL to whatever you want. Note that because we are grabbing all port 80 traffic coming in on wlan0, it doesn’t matter what you put for an IP address – it’ll all go to our server. The first block of code reads the HTTP request coming from the device, which will be saying something along the lines of:

GET / HTTP/1.1
Host: captive.apple.com
Accept: image/gif, image/jpeg, */*
... and so on

The script ignores everything except the GET /… part, from which it extracts the page name, if any. It won’t match (unless the test page is called “/kegs” – unlikely), so it will respond with the redirect code 302, to send the device to “/kegs”. The device sees the redirect, thinks it’s for a registration page and loads 1.1.1.1/kegs. This time the script sees that /kegs has been requested, sends a 200 OK code and the contents of index.html, which the device displays. My beer measurement system generates index.html as a page showing how much is left in each keg.

As a useful tool with which to quickly see the levels of my kegs without any fuss, this is rubbish, quite frankly. But then the whole raspberry-pi-based-keg-measurement thing could be replaced with cheap mechanical bathroom scales, so I might as well go all in on the pointless technology.

Updated 10/6/2020 : Improved the firewall rules.
Updated 18/2/2021 : Improved DNS rules.

The enchanted skip

Wednesday, June 15th, 2011

And lo! did Naich go rummaging in the Cav. skips in search of a bit of metal that would hold his reservoir securely in his chiller box.  Praying to Ceilliau Blewog, the goddess of salvage, he dived head first into the metals skip.  And in her wisdom Ceilliau Blewog did deliver unto his hand the perfect bit of metal, complete with holes already drilled in it.  And there was much rejoicing.  And Naich did praise Ceilliau Blewog and promise to offer up a sacrifice of a small annoying cat on his return home.

Beer Hutch!

Friday, January 15th, 2010

Young William and James were the luckiest boys in Cambridge.  Their father, a brilliant inventor, had built them their very own beer hutch! Fun and adventure was never far away, thanks to their thermostatically heated shelter which was large enough to hold a pressure keg and lots of bottles.  Actually, fun and adventure were some considerable distance away, and not getting any closer, thanks to their father not giving it to them and putting his beer in it instead.  They would only have used it to have zany adventures with an ironic twist at the end anyway, and I’d rather drink beer thanks.

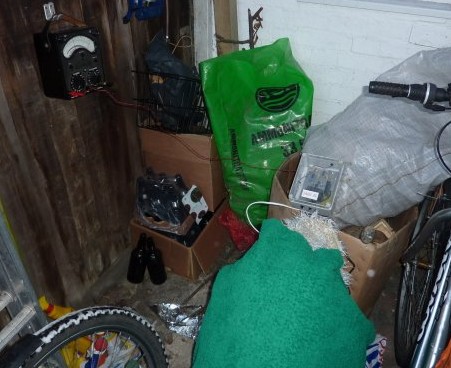
But why a beer hutch?  Home brew needs to be stored at the correct temperature, which is less than the inside temperature of a house, but more than the bloody freezing temperature it currently is outside; I don’t want to suck it like a lolly.  An outside cupboard or garage would normally be fine but unfortunately, at some point in its life, our Victorian terraced house had had its outside toilet and coal bunker knocked down and turned into a big kitchen.  With no thought as to how future residents would store their homebrew at the correct temperature – not very forward-thinking, eh?  For a while my beer lived outside, wrapped in a heated underblanket (found in a skip – very few stains on it but a broken switch), with its temperature controlled by a home-made (mainly from scrapped parts) thermostat:

There she is, huddled under her green blanket.  Just above is the control electronics and hanging on the fence is the temperature readout:

10.5 Degrees – just right.

This is all very well and good, but it’s a right pain actually getting the beer out – you have to lift up all the layers to get to the tap and take everything off to give her a puff of CO2.  Also, what do I do when I’ve got 40 bottles of beer as well as the keg?  So I needed a little beer hutch to keep the precious liquid at the optimum temperature.  Luckily, they were chucking out a load of under-bench cupboards from one of the labs at work:

Pretty tatty, but it’s built like a brick shithouse and it just needs a top, door, stronger back, insulation (walls and door are a chopped up Tesco Value duvet with skip-found insulated board top and bottom) and the heater blanket.  A couple of nights later…

Lots of insulation and the heated blanket installed.  What does it look like from the outside?  In a word – tasty.

The sharp-eyed might notice that the door is a) the wrong colour, b) the wrong size, c) hung wonky and d) upside down, but when you are hanging upside down by your feet from the edge of a skip, you can’t be choosy about the colour, type or which side door it is.  It shuts.  It opens.  It fulfills its purpose.

And now my beer is in her lovely new, hand-crafted home.  The end result:

Night night precious beer.