beaks.live finally got its update in 2025, a year late, and not as fancy as it was supposed to be. But it was bigger, it was better, and it had some seriously stupid circuits interfacing with the Raspberry Pi. Never has the phrase “if it’s stupid but it works, then it isn’t stupid” been pushed so far towards genuine stupidity.
I’m assuming that you have some knowledge of how electronic circuits work, but hopefully you will get some idea of what is going on, even if you don’t. I feel there is a certain beauty in simplicity when it comes to electronics. Most electronics these days seems to be buying little black boxes that do things and plugging them into each other, with no knowledge needed of how they work. For example, I could have bought a D/A chip with an I2C interface and just plugged it into the Pi, but I have op-amps and transistors lying around, and it was far more rewarding to do a little bit of designing and some simple calculations to make a D/A out of the stuff in my junk drawers. This post is about the joy of keeping it simple and stupid.
The original beaks box was pretty cheap and nasty, and full of hacks – an off-the-shelf box, a terrible quality webcam with no sound, hardly any night vision, and a cramped living space, barely big enough to stretch your wings. I didn’t like being a slum landlord, so some thinking outside of the box was needed.
The outside of the box
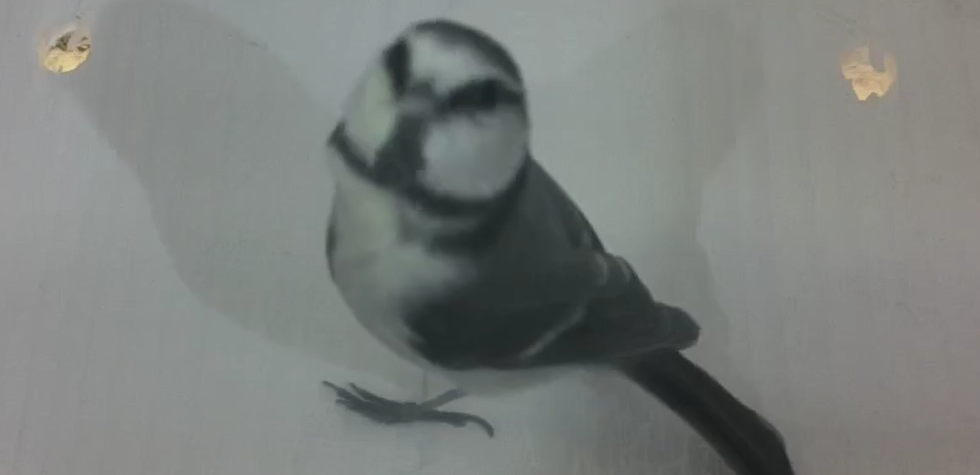
As well as increasing the size of the box, I wanted to watch the birds from a different angle. The original top-down angle means you miss a lot of the action – for example, when a parent is poking a grub down a chick’s throat, you only see the back of their head. A side view shows you details of the birds – I had no idea that their feet looked so weird. The camera also doesn’t want to be too close; improving the resolution and quality of the camera means you get the same amount of detail (in fact a lot more), even if the birds take up less of the frame. I didn’t want the bigger box to mean that some birds went out of shot because the view was too narrow.
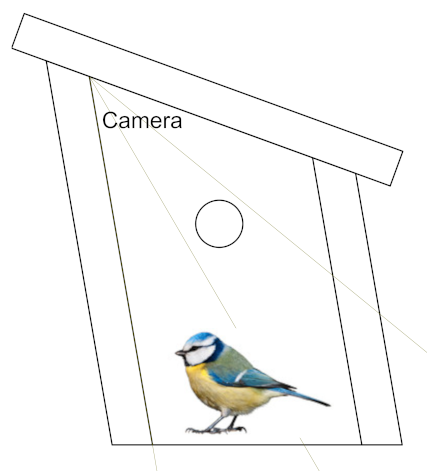
The design process gets a bit easier when you remember that birds don’t care about human aesthetics and are happy to nest in gnarled tree branches of any shape. The main consideration is the size of the hole in the front. The symmetry of the human-eye-pleasing one on the left below holds no benefits over the Skewbox / Slantbox / Italicbox / /box/ on the right.
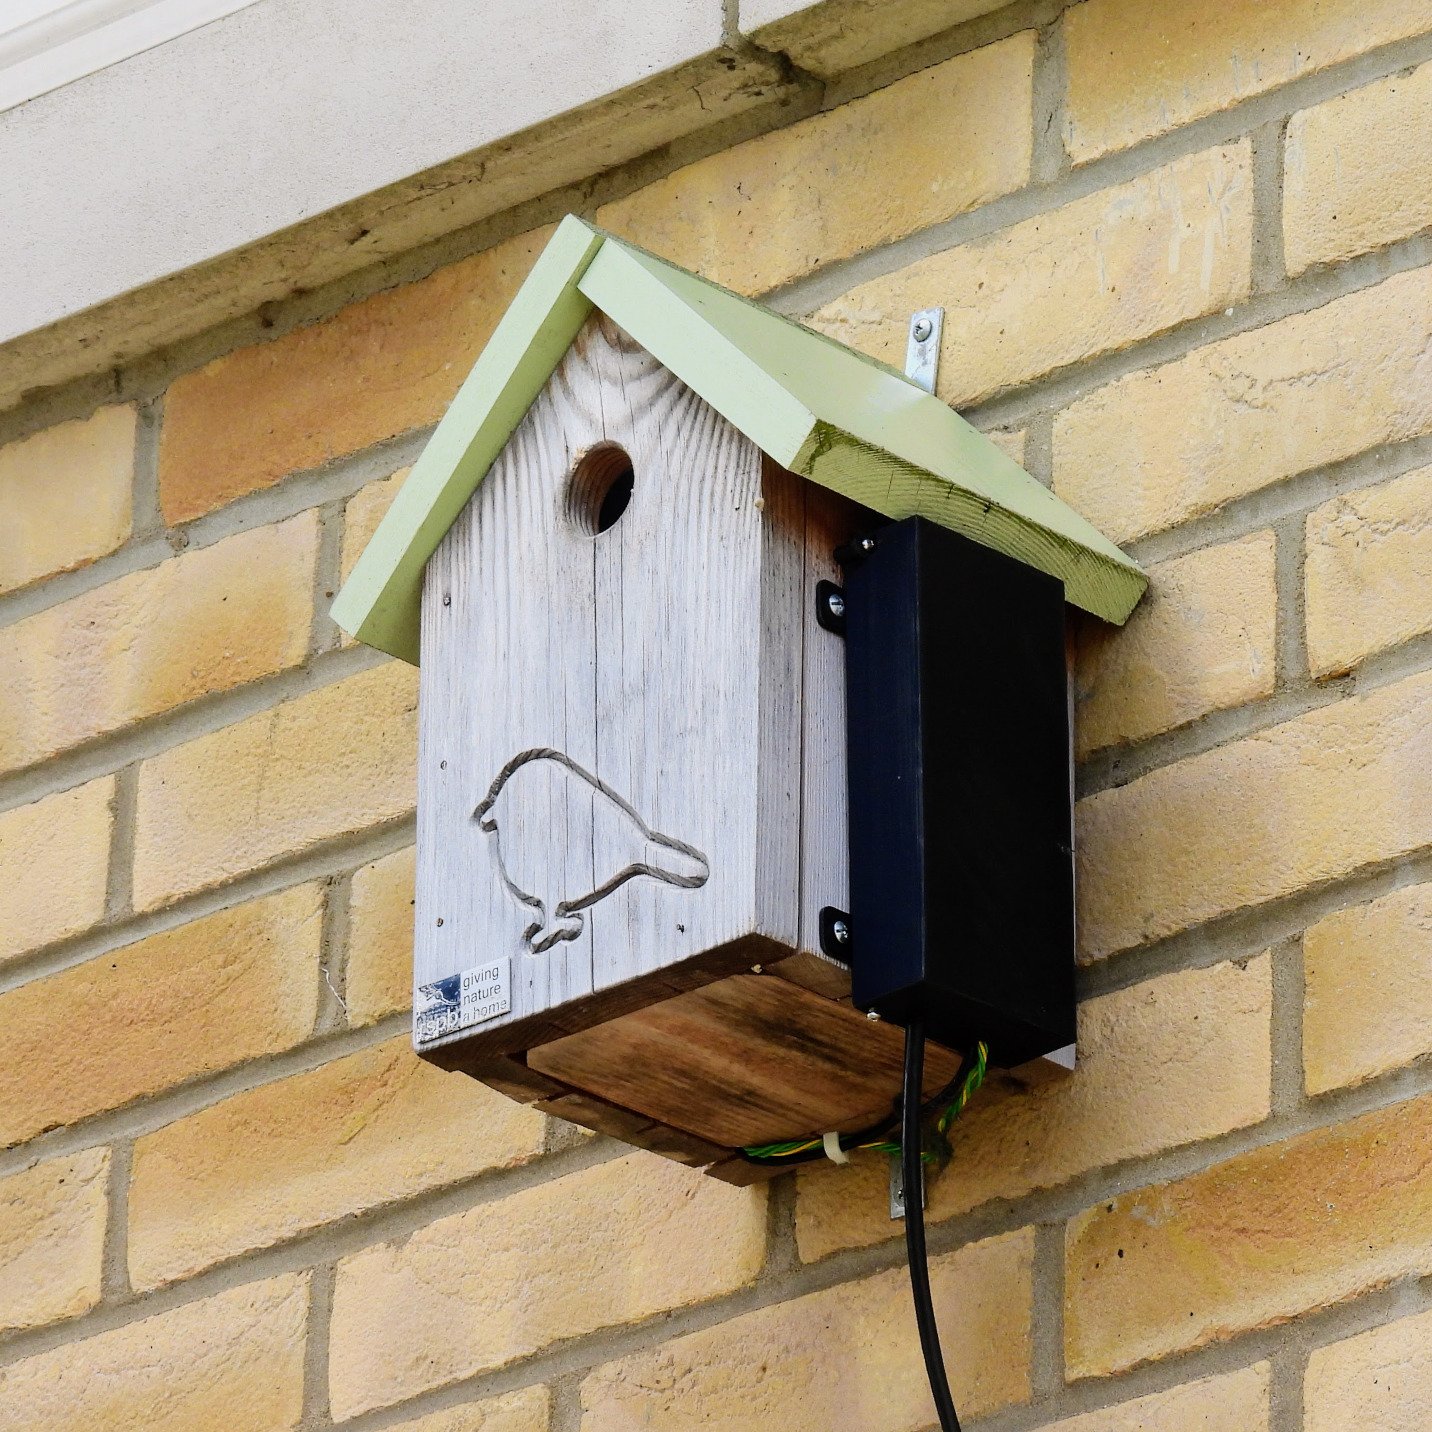
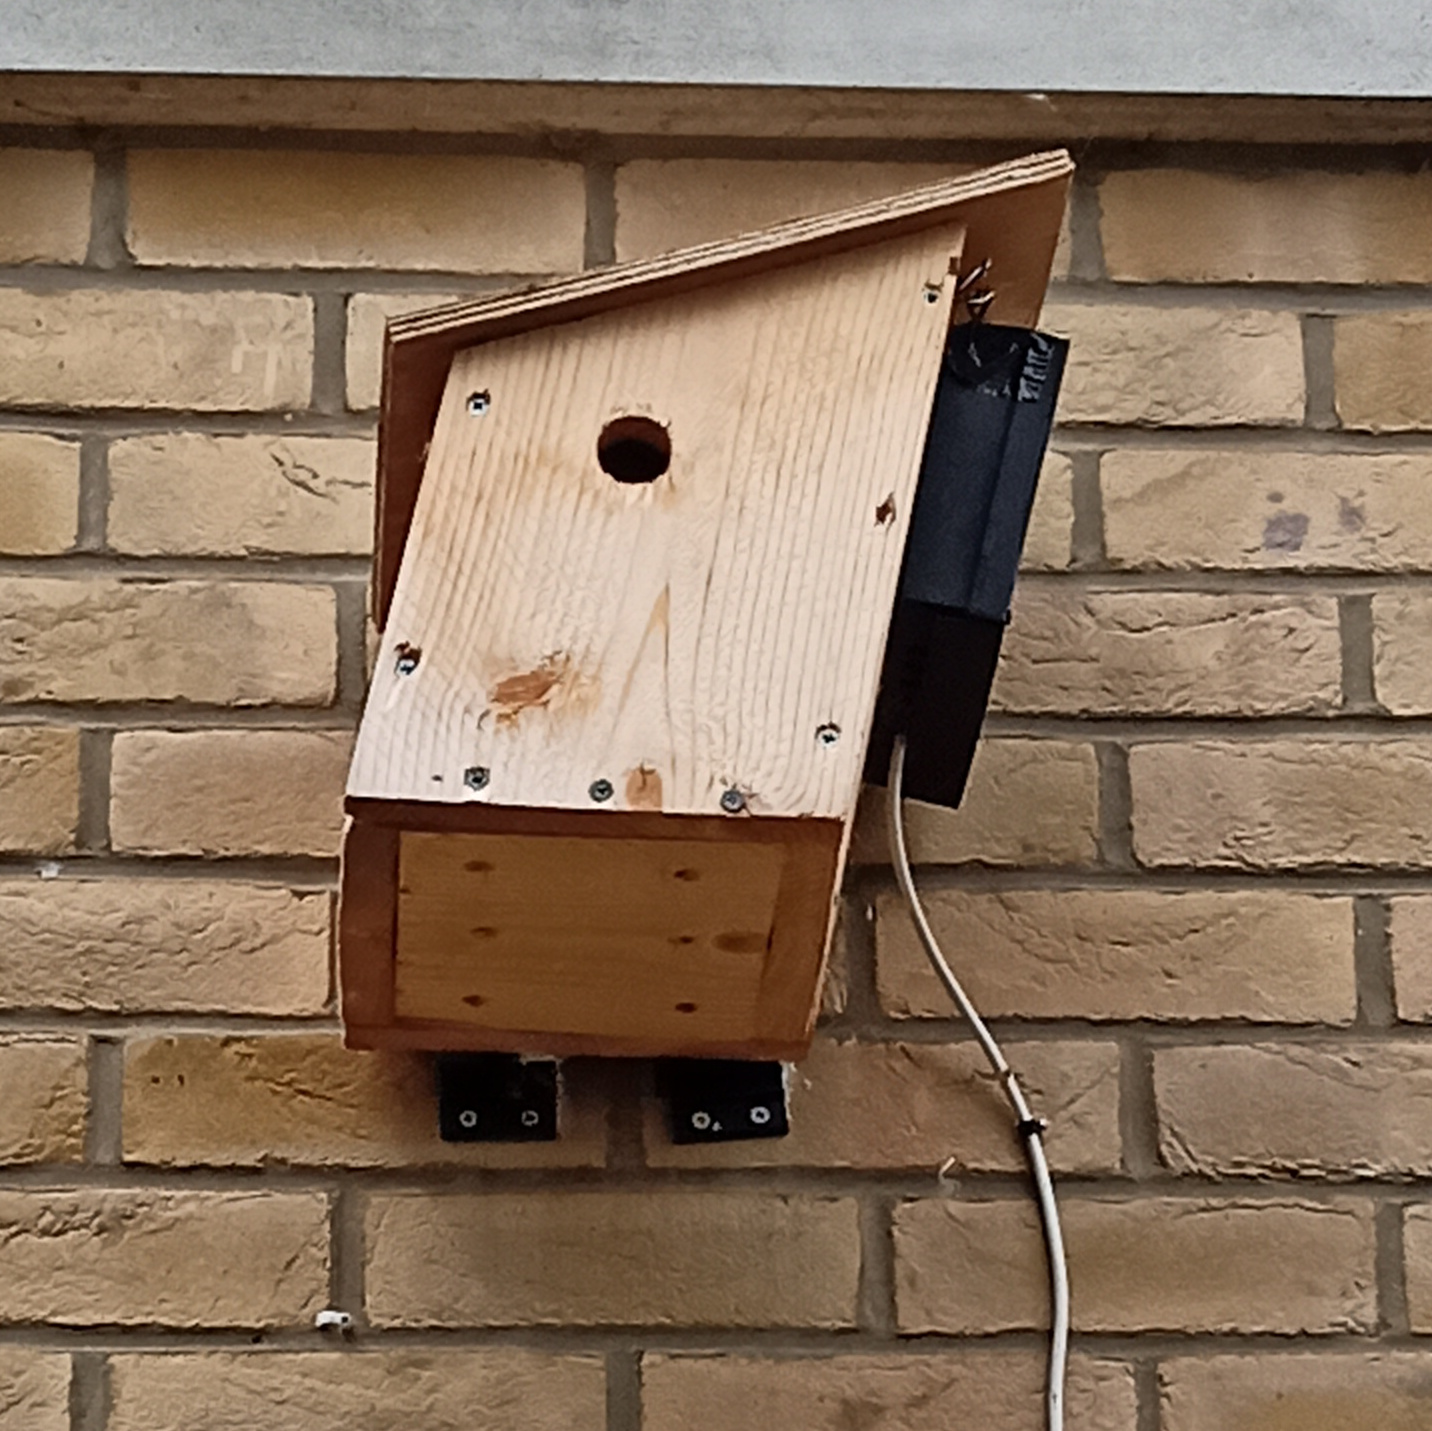
It’s wonky, it’s weird, it’s wugly, but it works.
Lights, Camera, Action!
The Raspberry Pi Camera Module 3 is a rather tasty little module which has an optional infra-red filter. The camera is very sensitive in the infra-red spectrum – more so than in visible light, so the filter basically makes it so colours aren’t drowned out by the infra-red. The original plan was to get one without the filter so I could light them up with infra-red light at night, and do the filtering in software to get something usable in daylight.
Turns out that they put physical filters on for a reason. The quality was so grim that it was just not possible to make it even remotely acceptable with software. I wanted to see blue tits, not smudgy grey tits. Still, at least they liked the box.
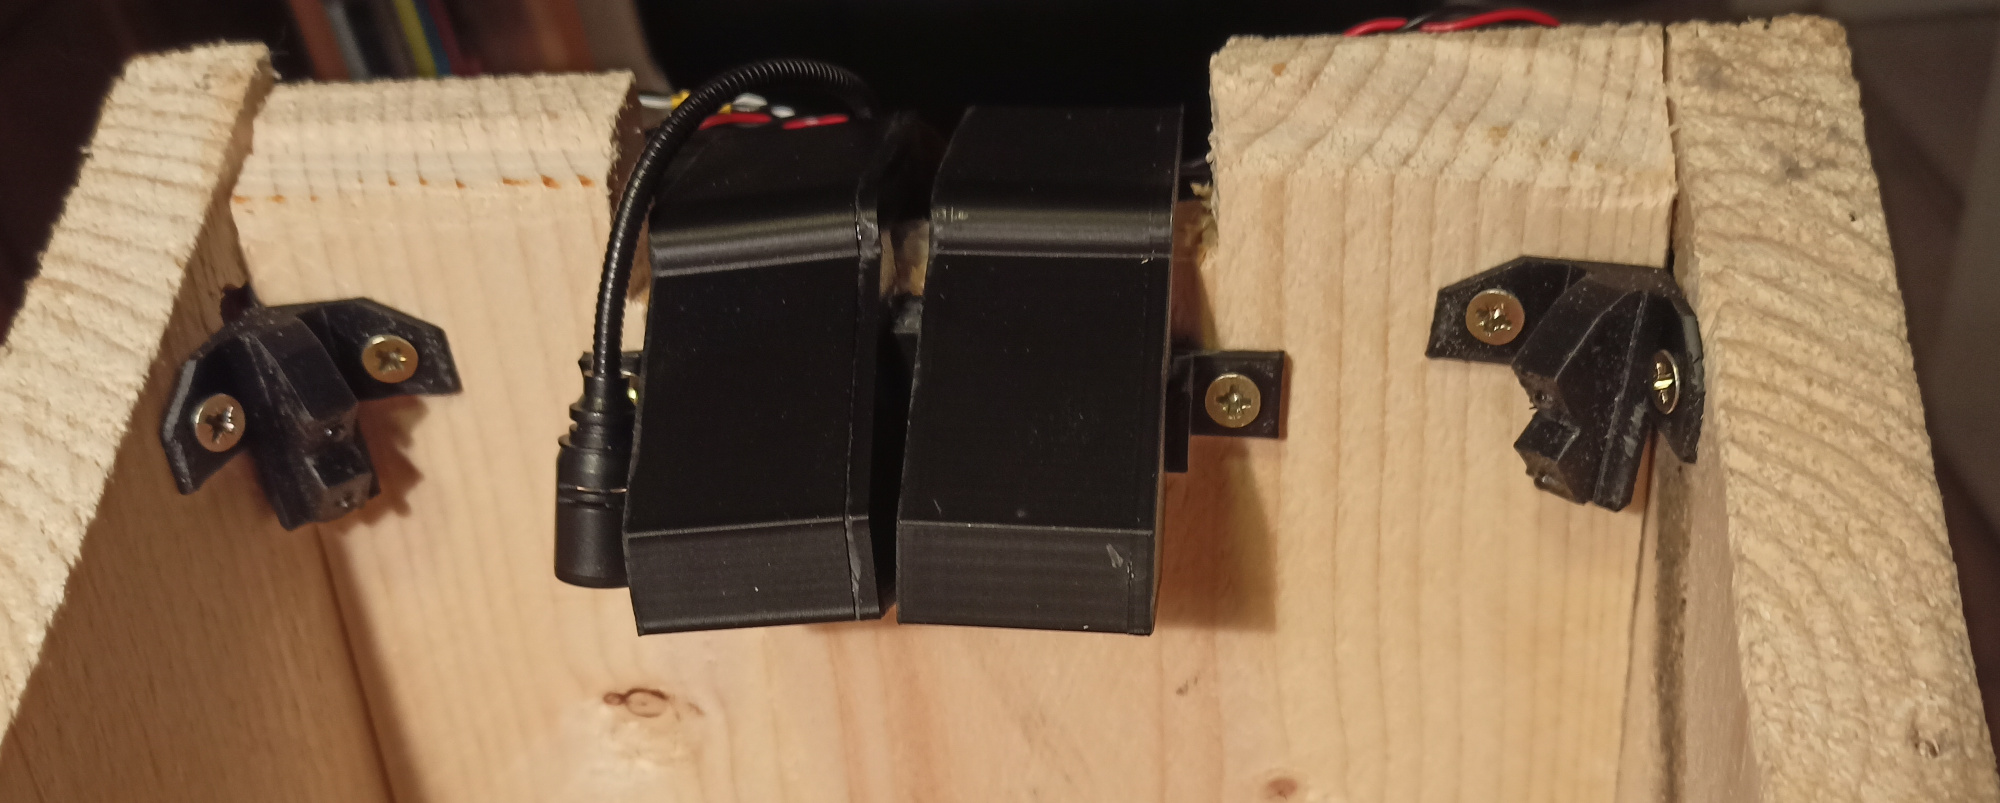
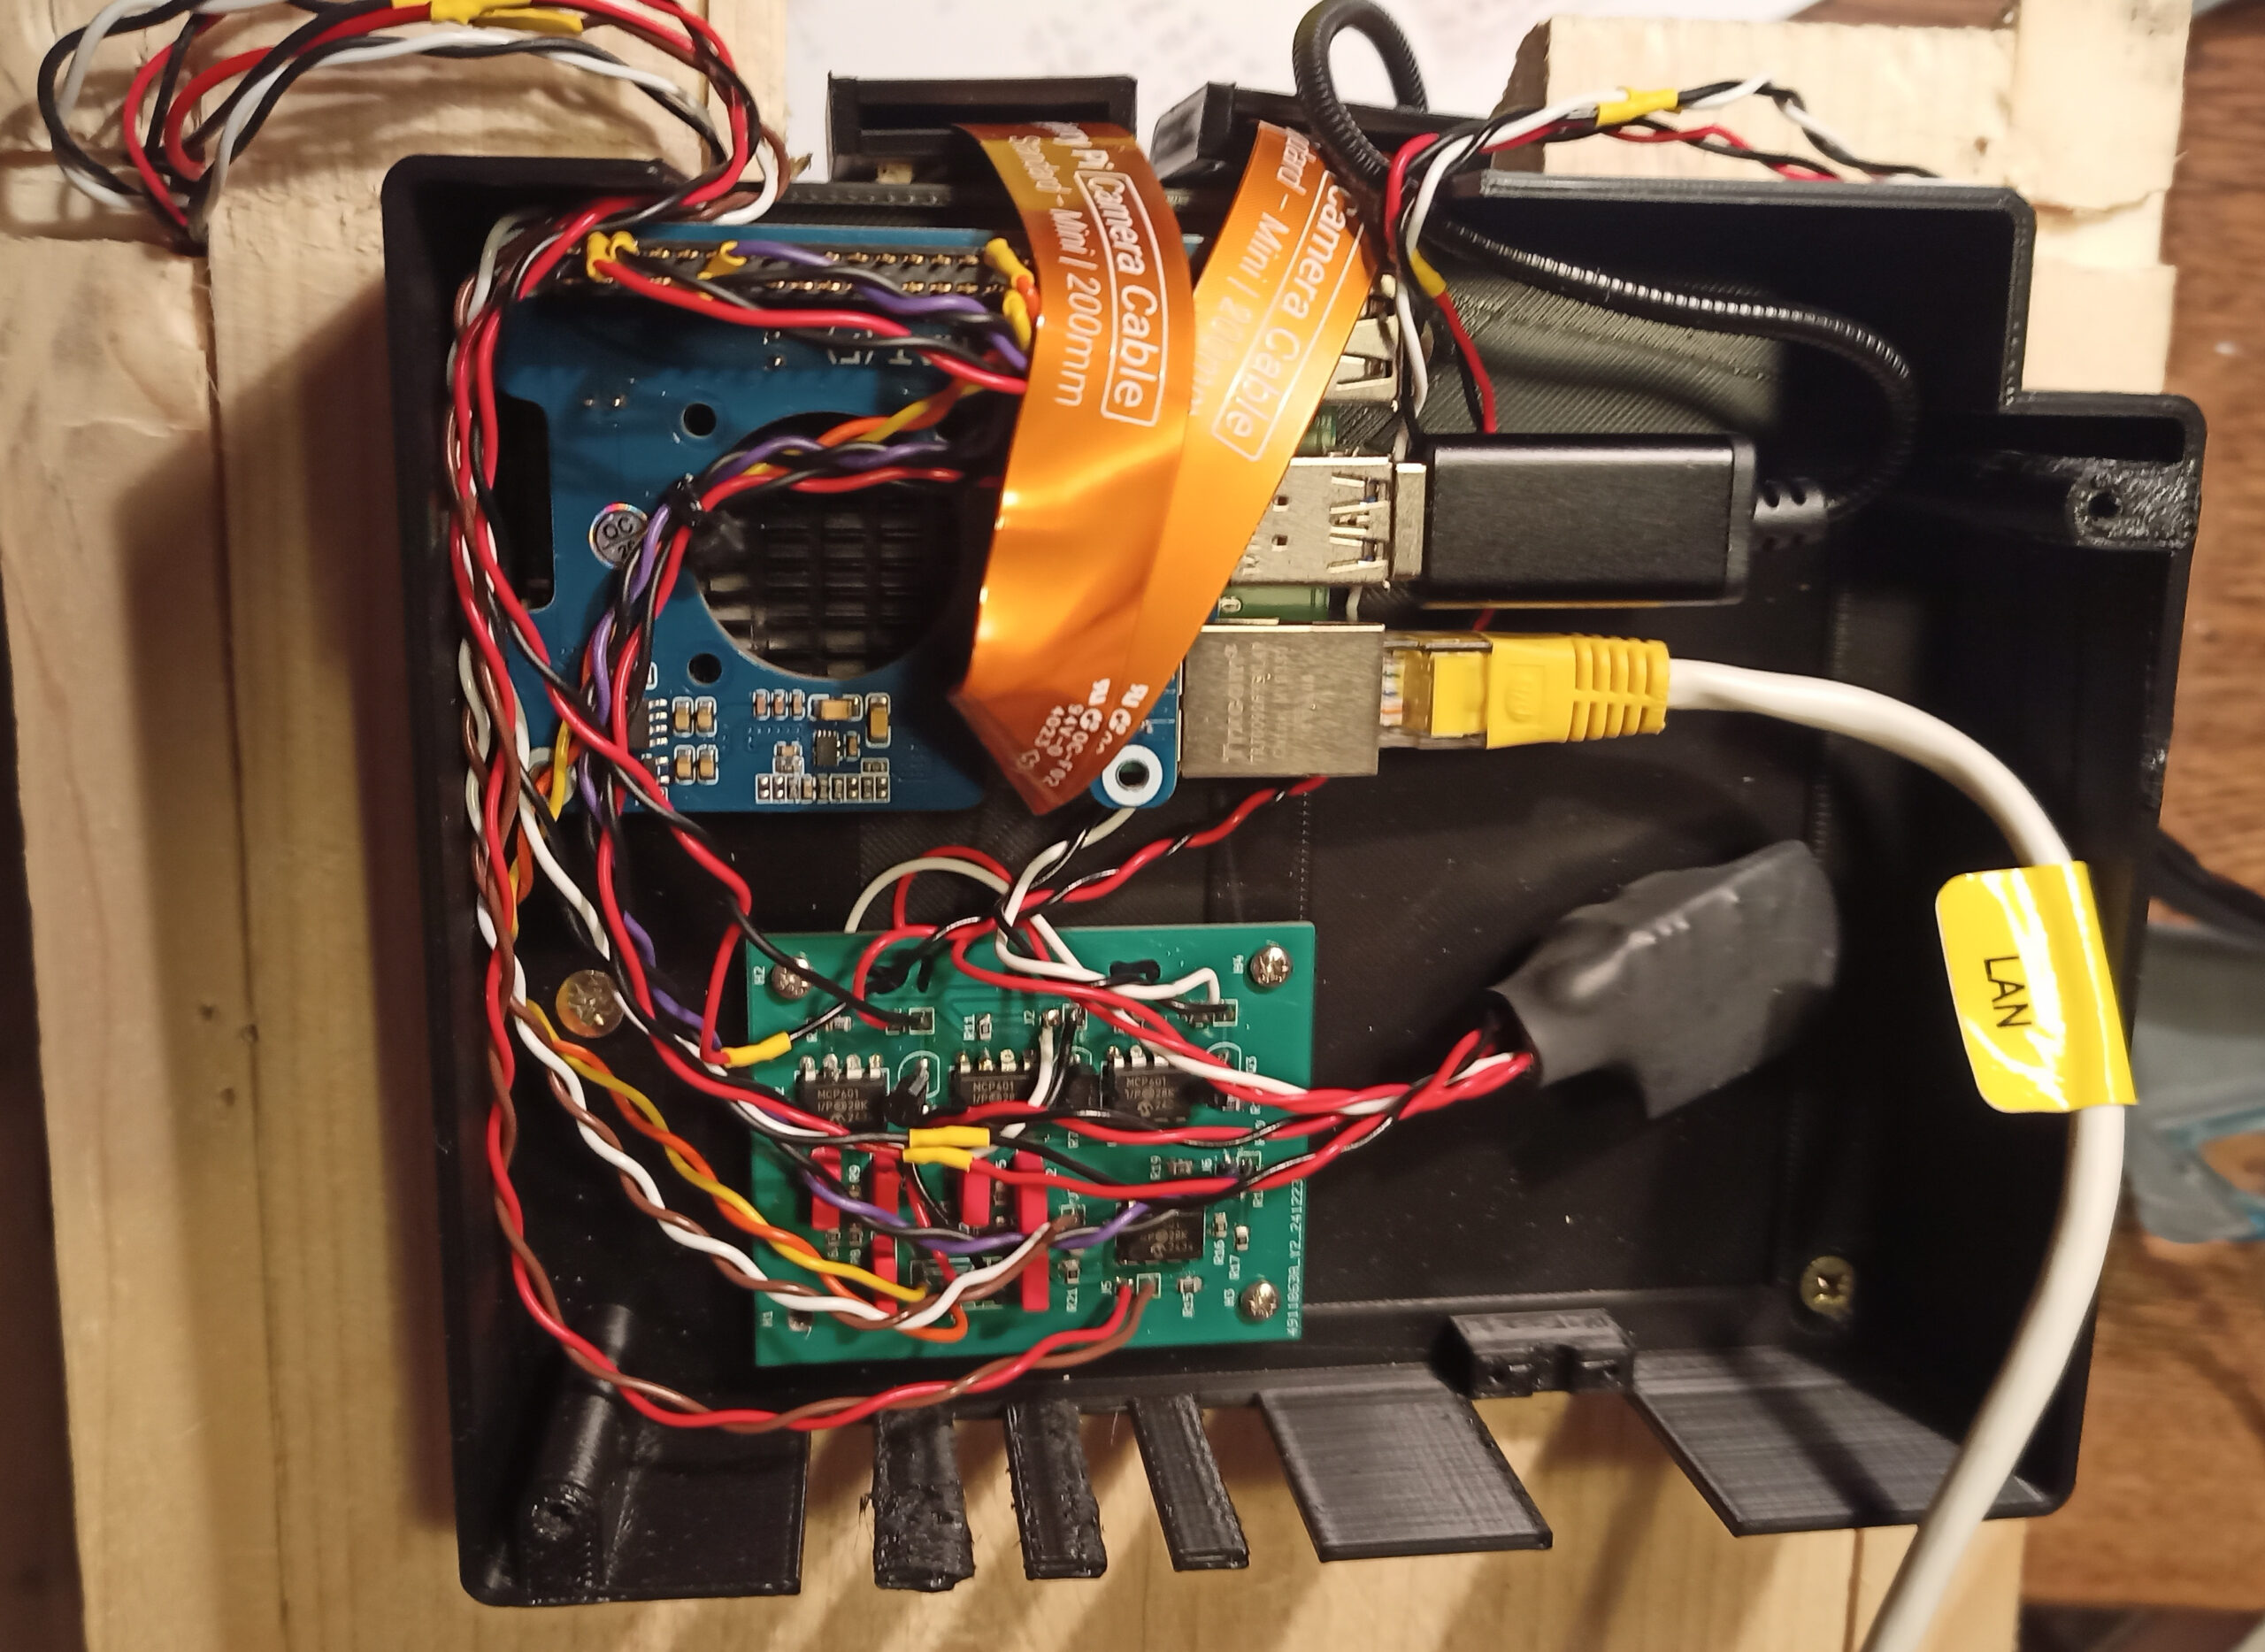
So, it had to be dual cameras – one for daylight, one for night-time infra-red illumination, seen here mounted in 3d printed cases and cunningly angled to have the same-ish view. To the left of it is the microphone, and in the corners are the LED lights – each with one white and one IR. Talking of LEDs, let’s look at the first stupid little circuit – a D/A converter and LED current driver. I hate buying stuff, so the main design consideration of any circuit I make is that it must be made out of bits I have lying around. This cheap and nasty D/A allows the Raspberry Pi to set the current going through the IR or white LEDs to anything from 0mA (out) to 19mA (full brightness):
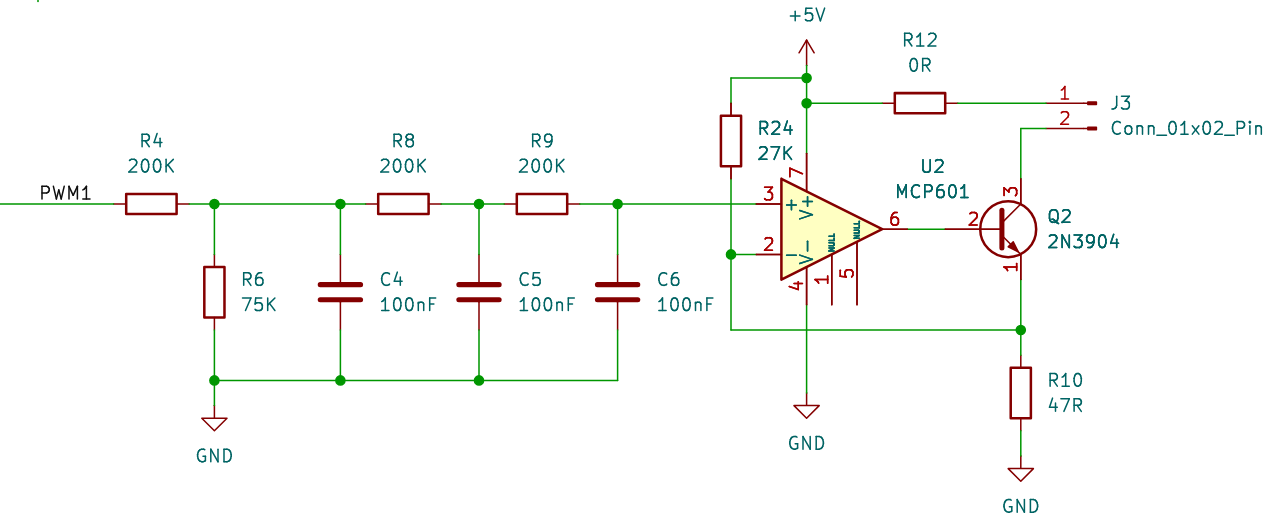
The LED goes on J3 and PWM1 comes from one of the Raspberry Pi’s Pulse Width Modulation outputs. So why the circuit above, rather than just sticking an LED on PWM1 and calling it a day? Although we can’t see the light flashing, it’s possible that the birds might and I didn’t want to make them think they were in a disco. It also might have caused problems with the camera, producing a strobing effect. R4/C4, R8/C5, and R9/C6 smooth out the pulses into a steady voltage. It’s a low pass filter, but in effect they convert the duty cycle of the output into a voltage between 0V and 0.9V.
So you have 0V – 0.9V going into the + input of the op-amp U2 with the – input connected to R10 and Q2 set up as a negative feedback current source. The inputs of the MCP601 can include ground, and although the output can go rail-to-rail, putting the LED on the collector side of Q2 means it doesn’t have to get anywhere close to V+. So we have 0.9V across R10 and 19mA (0.9V / 47R) flowing through Q2, and so also driving the LED at about the same current.
R24 is there to make sure that when the + input of U2 is 0V, there is a small bias voltage on the – input, clamping the output to 0V. This means we don’t have to worry about any input offsets in the op-amp keeping the LED turned on a little bit.
This circuit worked really well when I tried it in the living room. When it was attached to the side of the bird box, with the Pi being powered by power-over-ethernet, it flickered like a candle. The birds might have found this quite cosy, or they might have thought the box was on fire. By this time Mrs. B was almost moving in, so I couldn’t fix the problem then, and I just forgot about the white LEDs and drove the IR LEDs at 100%, which stopped the flicker. Since they all moved out, I have also not fixed the problem because I’m lazy. I’ve got about 4 months left to fix it before next year. Let’s face it – it’s quite unlikely it will ever be sorted out – 4 Months is not nearly enough procrastination time.
Fancy a bit of Light Metering?
The Raspberry Pi Camera Module 3 has all sorts of fancy exposure modes, so why not just use automatic exposure? The problem is in the nature of how the light gets into the box – almost exclusively through the entrance hole. On an overcast day the inside is lit fairly evenly, but on a sunny day you get a single blob of blindingly bright light, which moves across the box as the sun moves across the sky. This completely messes up any sort of automatic exposure – it either tries to average the bright spot with the rest of the dim box (too bright spot, too dim box) or set the exposure for the light blob (well exposed blob, black rest of box). I could not find a way of setting it up so it ignored the moving bright spot and set the exposure correctly for the rest of the box. The answer was to set the exposure depending on the general instensity of the light outside the box, using a light meter – a phototransistor that looked out of the house’s window next to the bird box, and an A/D to turn the intensity into a number.

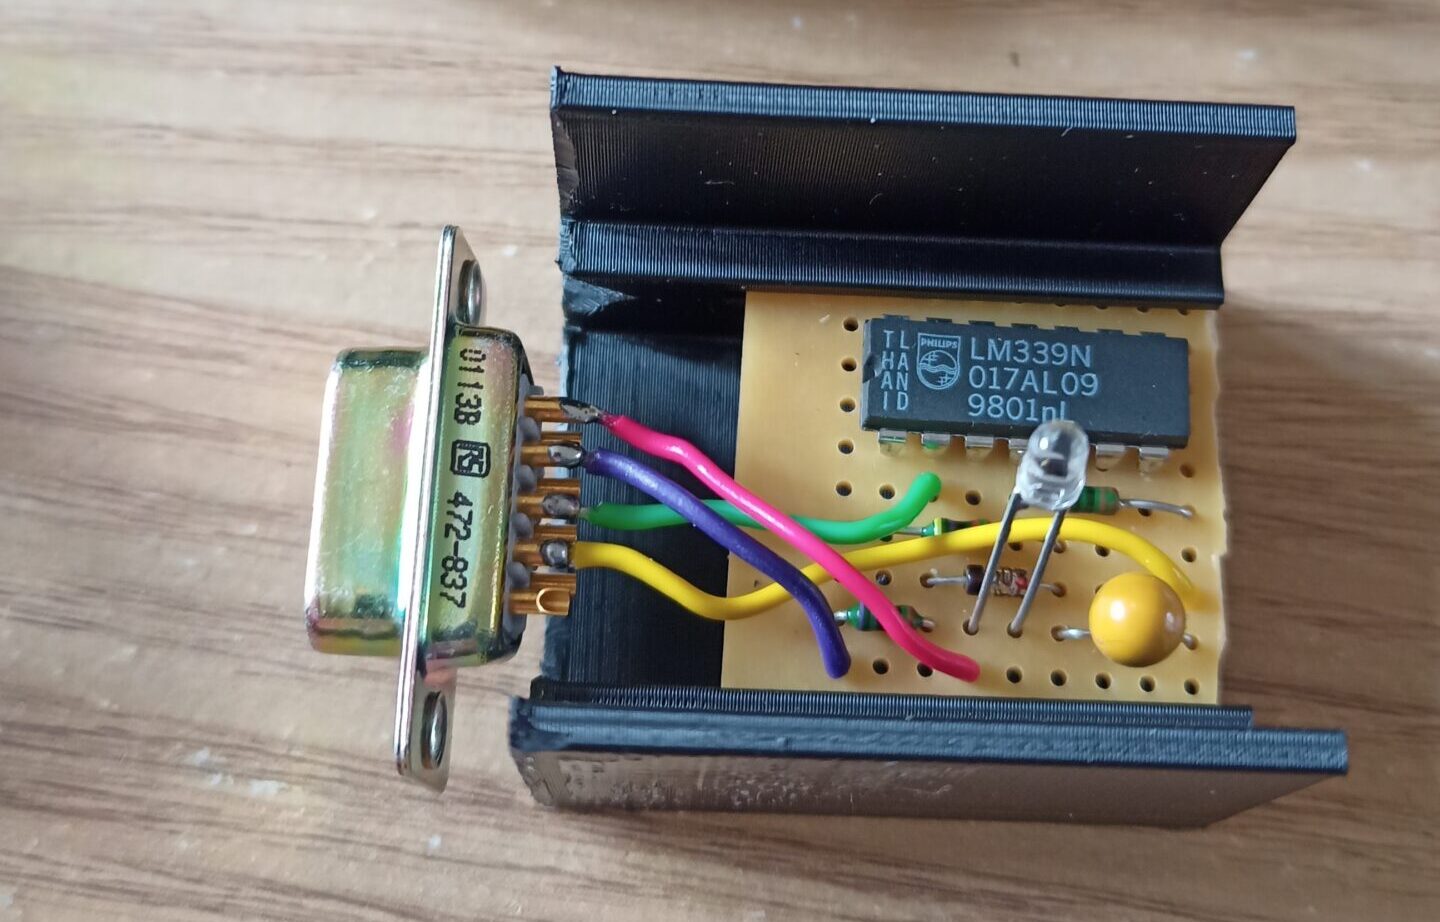
That there is a light meter, incorporating an A/D converter. Seriously. You put a phototransistor on J2, and plug J1 into a Raspberry Pi – pin 3 on a GPIO output and pin 2 on a GPIO input. I love this one because it’s so stupidly simple – you don’t even really need R3 and D1, so the component count can be as low as 5. The LM339 has an open collector output, and the Pi has pull-up resistors built in, so that’s another component saved.
The current through the phototransistor is proportional to the light hitting it – in this case I think it was 0.3mA in daylight, which corresponds to 3V on the – input of U1A. In order to measure this voltage, the Pi sets the GPIO output connected to J1/3 high and then the Pi measures how long it takes until the + input of the op-amp goes higher than the – input and J1/2 goes high. The time is proportional to the amount of light hitting the sensor.
Benefits of this type of A/D are:
- Low component count.
- Horribly innaccurate.
- Unknown conversion time.
- Long (we are talking large fractions of a second) sample time, getting longer the more accurate you want it to be.
- You have to reset the Pi’s GPIO output on J1/3 to 0V and wait for C1 to discharge before you can do another sample. If you don’t wait long enough the next reading is garbage. R3/D1 speed this up a bit.
- Non-linear measurements.
You might have noticed that only the first blob is an advantage, but the poor little fella looked lonely so I put all the disadvantages with him.
Of course, I’m not the first one to think of this, and you will usually see this sort of A/D with another op-amp used as an integrator (like the one on the right) to give a nice linear rise time on the capacitor. Because linear is better, right?

Well, in this case we can chalk one up to the stupid club because light isn’t linear. The exponential nature of light matches with the exponential nature of the RC charging circuit, producing a linear range that suits the exposure settings of the camera – which are non-linear to match the non-linear nature of light. Is this making sense yet, or do I have to say “non-linear” again? So, to take a light reading from your Pi:
- Record the system clock mS value.
- Set the GPIO output high.
- Loop round (I tried using interrupts, but it was easier to loop) until the GPIO input goes high or you have waited long enough.
- Subtract the current system clock mS value from the one in step 1. This number is the light intensity.
- Set the GPIO output low for the next reading.
There’s the thing that kept the beaks properly exposed in their nest. It plugged into another Raspberry Pi which took a reading every few seconds, normalised to a range of 0% (total darkness) to 100% (direct sunlight), averaged them over a few minutes, and presented the result over a local network API. It took a bit of tinkering to get the exposure settings right, but I think it worked rather well in the end. It wasn’t always spot-on but I think it gave the viewers a sense of atmosphere when it looked slightly gloomy or vividly bright.
Next year it’ll be integrated into the unit on the side of the bird box or, more likely, stuck back on the window with Blue Tack again.
Everything else
I’ve been rabbiting on for a while now, so I’ll wrap up with the other new box features.
Sound
A cheapo USB microphone plugged into the Pi. It works pretty well but it’s difficult to reliably sync the sound with the video. I think I managed to do it about a week before all the birds buggered off.
Beak Ingress Detector
An IR LED and photodiode put across the entrance to detect when a bird goes in or out.
Yes, it worked, but the birds did have a habit of sitting on the inside of the hole, looking out and breaking the light beam like they were flying in and out. Some error correction is needed somehow. Or maybe detect the weight difference in the box, to see how many birds are in there? Probably a project for 2027, along with a better way of attaching it to the wall.