Raspberry Pi

Pirpl – it’s another Pirate Radio PLaylist thing!

Old Radio Station EditedIf you liked the previous Pi-rate Radio Jukebox (and 15 people did!), you won’t want to miss this latest version of it.  It’s basically the same thing, but it runs as a daemon, so you can fire up your favourite tunes using a browser rather than logging in to your Pi to start up scripts.  As usual it’s horribly coded in Bash and features a fuck-ugly interface with no aesthetic considerations whatsoever.  You can insert prettiness yourself if you want to – it’s easy enough because the web pages are done as templates.  All the code is commented to
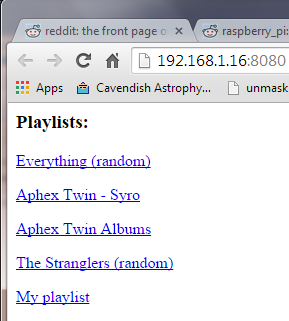
 pad it out and make it look more substantial than it is clearly show what is going on.

This one is called Pirpl and is pronounced “Purple” because it seemed like a good idea at the time.  Something to do with Pirate Radio PLaylists or something – it’s all a bit tenuous, quite frankly.  Anyway, the main improvement is that rather than telling it what to play from the command line,  you pick what you want to listen to from a list on a web page.  As before, you can tell it to play all the MP3s in a directory (and all sub-directories) or give it a list of MP3s to play in a file.  It’ll then play them (in a random order if you want), showing the current tune on a web page and allowing you to skip a track or stop playing and go back to the playlist chooser.

Other improvements are:

  • Support for MP3 ID tags in both version 1 and version 2 format.  The old player only recognised version 1 tags.
  • Umm… that’s about it really.  The code is slightly better in places, I suppose.  Still the playlist choosing thing is good, isn’t it?

Quick start

pirpl
Nice clean lines. What is not to like?

Want to get going already?  This is the tarred archive (20.8 kB)

Download the archive, untar it, edit the “pirpl_conf” file (you’ll see why in the file) and add playlist information to the “pirpl_playlist.conf” (you’ll see how in the file).  Before you can start it up, you need to make sure that the following packages are installed on your Pi:  netcat, sox, id3v2.  If one or more isn’t then, install any missing ones with

sudo apt-get install netcat sox id3v2

The program that does the transmitting needs to run as root, so setuid  that bad boy up with:

sudo chown root:root pifm
sudo chmod 4755 pifm

Before you can oscillate any electromagnetic fields, you’ll need to make an aerial for your Pi.  Instructions are in first paragraph of the drivel for pirbj.

Once you are sorted, start the whole lot up with the command:

./pirpl.sh pirpl_conf

To stop it press CTRL-C.

The gruesome details

There are quite a few files that make up pirpl.  This is how they work.

pirpl.sh

This is the main program file.  Have a look at it if you want to gaze in wonder at the insane beauty of Bash, but there is no need to edit it.  All the configuration stuff is now in…

pirpl_conf

Various settings for things like the names of files, the transmitter frequency and where you installed pirpl.  You probably want to change the transmitter frequency to somewhere empty on your radio’s dial.  You will also need to change PIFM_BASE to the directory where you untarred the files.  The web server port should not be accessible to the outside world.  Other than that, it’s probably best to leave everything else as it is unless you really like reading error messages.

pirpl_playlist.conf

This is where you tell pirpl all about your music.  Each line has the path to the playlist or directory containing MP3s, the displayed name of the playlist, and whether to shuffle it.  I’ve left all my playlists in as examples.  Actually, I forgot to delete them and now I can’t be bothered to take them out.  Sorry.  If you are using a playlist rather than a directory, the format is one path to an MP3 per line.

pirpl_playlist_template.html

Your browser will show this as a web page so open that link, right click and choose “View page source” to see what is in it.  You have probably worked out for yourself that this is a template file for showing the available playlists, as defined in pirpl_playlist.conf.  The bits in “@@”s are replaced with the information about playlists.  I’m sure you can work out what’s going on in that file.

pirpl_template.html

This is the template for showing information about the track that is playing.  It’s the usual stark functionality you get from me, simply because it works and I can’t be bothered to try and make it look nice.

pirpl_server.sh

This is the script that does the web server.  It doesn’t do much; it just outputs a file to the browser and filters commands out of the text sent by the browser, storing any it finds in a file which is picked up by pirpl.sh.

pifm and source/pifm.c

The program that does the transmitting.  It’s a barely modified version of this one and the source is included if you want to have a look and compile it yourself.

startwrapper.sh

The best way to start Pirpl is as a service, when the Pi boots up.  You don’t want to run it as root, so the easiest way to start it as a normal user is to put a command similar to this in your /etc/rc.local file:

sudo -u naich /home/naich/pirpl/startwrapper.sh

You could use sudo to start Pirpl directly but you end up with sudo hanging around like a bad smell in your process list.

In conclusion

Using this program without the proper license is probably illegal where you are, so don’t use it ever.

Pi-rate Radio Jukebox

p1070168Note: there is an update to this post.

There is a nice hack for a Raspberry Pi where you can turn it into an FM transmitter.  While this is illegal in most countries, the range is quite limited so it’s fairly unlikely you’ll go to prison. The only hardware needed is your Raspberry Pi and a piece of wire attached to pin 7 (GPIO 4) of the GPIO connector.  The length of the wire depends on the frequency you are transmitting on – roughly speaking, it should be 299/(frequency x 4) metres long.  So 103 MHz is 725 mm.  Or if you are using inches, 299/(frequency x 0.1016) inches.

It’s very easy to transmit internet radio using just one line of Bash but if, like me, you have a few thousand MP3s , there’s no quick and dirty way to pump them out to the transmitter.

Until now.  Behold the PIrate Radio Juke Box (pirjb). If you can think of a better name for it, please leave a comment.  A couple of Bash scripts, a minor alteration to the pifm code and a reckless disregard for radio licensing regulations is all that is needed to listen to your collection on any FM radio.   You can repeat and shuffle with either a playlist of MP3s in a file or point it to the directory the MP3s live in and it’ll scan them and make its own playlist.

Also included is a web server to show you the currently playing track.  Using your browser, you can skip to the next track or shut everything down and turn the transmitter off.  Note that you can’t turn it back on with the web interface yet.  That’s the next thing on the to do list.  You can get to the page by going to http://your_pi_address:8080/  The “8080” is set in the pirjb.sh file, at the top.

Note that I do not condone or encourage the use of transmitting equipment without the proper license.  This article is presented purely as an exercise in theoretical programming.  Your statutory rights are not affected.  Your home may be at risk if you set fire to the curtains.

Setting up

You need to have the following packages installed: sox, netcat, mp3info.  Use

sudo apt-get install sox netcat mp3info

to install them.

Copy the pirjb archive to an empty directory on your Pi and extract the files with

tar zxf pirjb.tgz

You need to edit pirjb.sh.  The top few lines are where things like the transmission frequency, path to the scripts and the port for the web server are defined.  There is also a line for the compander settings for sox in order to have an AGC.  If you didn’t understand that last sentence, don’t change that line.  I’ve also included the source for the pifm binary included in the archive.  There is a very minor change to it from this one – calling it with no parameters turns off the transmitter.  Please do compile it and use it instead of the binary I’ve put in the archive.  You shouldn’t really be running binaries from random geezers on the interwebs anyway.  And I am sometimes quite random.

You need to make pifm run as root using setuid in order for the transmitter to work.  Do this with:

sudo chown root:root pifm
sudo chmod 4755 pifm

To run it use:

pirjb.sh -d <directory name>  or
pirjb.sh -p <playlist>

Switches are -s to shuffle the track order, -r to repeat the playlist indefinitely.  The playlist file should have the full path of each mp3 you want to play per line, i.e.

/home/naich/music/Wombles Christmas Special/01 Wombling Christmas.mp3
/home/naich/music/Napalm Death/Scum/Human Garbage.mp3
… and so on.

Have fun playing with it and do not use it because it is illegal to do so.

Files included in the archive:

  • pifm : The transmitter binary
  • pirjb.sh : The jukebox script.  Edit the first few lines for your system.
  • pirjb_webserver.sh : The webserver script.  No need to edit it.
  • pirjb_template.html : The template for the web server page.  See pirjb_webserver.sh for information about using it.  Or just look at the file itself and have a guess.  It’s not hard to see what’s going on.
  • source/pifm.c : The source for pifm.  Compile with g++ -O3 -o pifm pifm.c then copy over the top of pifm.  Don’t forget to chown and chmod the compiled program.

Miscallaneous Wibble

This post is part of a short series of tutorials for people who are new to using their Raspberry Pi.  It will make more sense if you start at the beginning.

Continued from here.

First page here

12.  Some other useful bits and bobs

Firstly, let me say that Linux is a huge subject and I’m only scratching the surface here.  Also, my knowledge on the subject is not that great; I know enough to get by and Google for everything else.  Secondly, all this huge operating system is contained within the 2GB SD  card plugged into your Pi.  That’s about £30 of hardware to create what used to be called a mainframe computer, and if you aren’t impressed by that, you haven’t understood how much your Pi can do.  Here are some bits and bobs that you might find useful as you learn more.

12.1  Pipe to your grep

Pipes were briefly mentioned earlier, as a way to stop text whooshing off the top of your screen by appending |more to the end of a command.  Here is a brief, incomplete and misleading explanation of how they work.

It’s in the nature of computers that programs take something in, do something and then put something out.  A program with no inputs or outputs doesn’t do much, after all.  You might think that command line programs take their data in from the keyboard and put it out to the screen but they actually talk to the streams, stdin and stdout – which you can think of as being like a plug and socket, one at each end of the program, through which data is poured.  It is the shell (Raspbian uses “bash” by default) that acts as an interface between you and the computer, linking the keyboard to the stdin stream and the screen to the stdout stream.  Thanks to the standardised way data is pumped in and out of programs, you can join them together so the output of one program becomes the input of another.  This is done with a “pipe” – | which is simply placed between the programs so that the data flows from left to right.  Examples will probably make more sense than words.

grep” is a program which searches for words through whatever text is put into it.  There are many ways to use it; like searching through files for a word – let’s find lines containing the word “transmission” in the log file for dpkg (which is used by Apt):

naich@raspberrypi ~ $ grep transmission /var/log/dpkg.log
2012-08-06 12:39:49 install transmission-common:all <none> 2.52-3
2012-08-06 12:39:49 status half-installed transmission-common:all 2.52-3
... and so on ...

grep can also take its input from stdin (it automatically does this if you leave the filename off the end of the command), with a pipe.  In this example, “cat filename” prints the contents of the file “filename” which is then piped to grep which prints lines containing “transmission”:

naich@raspberrypi ~ $ cat /var/log/dpkg.log | grep transmission
2012-08-06 12:39:49 install transmission-common:all <none> 2.52-3
2012-08-06 12:39:49 status half-installed transmission-common:all 2.52-3
... the same stuff as above ...

But it’s still whooshing off the screen, so let’s take the output of “grep” and pipe it to “more” (no filename after the “more” command makes it read from stdin), which paginates it:

naich@raspberrypi ~ $ cat /var/log/dpkg.log | grep transmission | more
2012-08-06 12:39:49 install transmission-common:all <none> 2.52-3
2012-08-06 12:39:49 status half-installed transmission-common:all 2.52-3
...
2012-08-06 12:40:01 status unpacked transmission-daemon:armhf 2.52-3
--More--

Or we could use “wc” to count the number of times it appears.  As with “grep” and “more”, leaving off a filename makes wc read text from stdin rather than a file.  “wc -l” counts the number of lines stuffed into its stdin:

naich@raspberrypi ~ $ cat /var/log/dpkg.log | grep transmission | wc -l
31
naich@raspberrypi ~ $

All these programs have man page help, by the way.  grep is probably the most useful tool in the Linux toolbox so it’s worth finding out about it.  Also read up about redirection, which is a related subject.

12.2  Processes, and how to kill them

All programs that run on the Pi (known as “processes”) – autonomous daemons, interactive programs and even the program that boots it, have two things – a unique ID number (process ID or “pid”) and a user who owns it (user ID or “uid”).  Well, obviously they have more than two things, but these two are the most important.

The pid is a unique number between 1 and 32768.  Each process gets a pid when it starts which is one more than the previous one assigned, unless it’s already taken, in which case the next higher one is assigned.  The numbers wrap round to 2 (1 is always used by the “init” process) when they hit 32768.

The process also has a user ID (uid), the same as one of the users on the system, as if the user had started the process himself.  The process inherits the identity of the user, writing files in his name for example, and has the same permissions to read, write and execute files as that user.  So a process running as “root”, with a uid of 0 can do anything.  Processes that don’t need to run as root tend to run as their own user, in order to sand box them into their own little world.  You can see this, for example with Transmission, which runs under the uid of 106 – debian-transmission.

You can get a list of processes currently running on your Pi with the “ps” command:

naich@raspberrypi ~ $ ps -ef
UID        PID  PPID  C STIME TTY          TIME CMD
root         1     0  0 Aug20 ?        00:00:14 init [2]
root         2     0  0 Aug20 ?        00:00:00 [kthreadd]
root         3     2  0 Aug20 ?        00:00:09 [ksoftirqd/0]
... lots of processes ...
106       2382     1  0 Aug21 ?        00:22:56 /usr/bin/transmission-daemon --c
107       3527     1  0 Aug23 ?        00:13:52 /usr/bin/mediatomb -c /etc/media
root      3860  1949  0 11:35 ?        00:00:00 sshd: naich [priv]
naich     3867  3860  0 11:35 ?        00:00:00 sshd: naich@pts/0
naich     3868  3867  0 11:35 pts/0    00:00:01 -bash
naich     3941  3868  0 12:27 pts/0    00:00:00 ps -ef
naich@raspberrypi ~ $

This shows the user ID (UID), process ID (PID) the process ID of the process which started it (PPID), the start time (STIME), the amount of CPU time it has taken up (TIME) and the command that started it (CMD).  Another, more interactive way to show processes is with the “top” command:

naich@raspberrypi ~ $ top
top - 12:41:13 up 3 days, 16:25,  1 user,  load average: 0.00, 0.01, 0.05
Tasks:  57 total,   1 running,  56 sleeping,   0 stopped,   0 zombie
%Cpu(s):  1.3 us,  1.6 sy,  0.0 ni, 95.4 id,  0.0 wa,  0.0 hi,  1.6 si,  0.0 st
KiB Mem:    220592 total,   209612 used,    10980 free,     7192 buffers
KiB Swap:   102396 total,      568 used,   101828 free,   163588 cached

  PID USER      PR  NI  VIRT  RES  SHR S  %CPU %MEM    TIME+  COMMAND
 2382 debian-t  20   0 43732  11m  896 S   1.0  5.1  23:02.69 transmission-da
 3945 naich     20   0  4616 1348 1028 R   1.0  0.6   0:00.22 top
 3527 mediatom  20   0  152m 9.9m  800 S   0.3  4.6  13:53.06 mediatomb
 3867 naich     20   0 10524 1768 1056 S   0.3  0.8   0:01.54 sshd
... and so on ...

The “%CPU” and “%MEM” show the amount of CPU time and system memory each process is using at this moment and is useful in catching processes that are running out of control.  Press “H” to see the help page or “Q” to quit.  If you need to stop a process running and can’t find a way to do it nicely (with “service process stop”, for example), then you can kill it with kill.  Let’s make a process and kill it.

naich@raspberrypi ~ $ sleep 600 &
[1] 3984
naich@raspberrypi ~ $ ps -fu naich
UID        PID  PPID  C STIME TTY          TIME CMD
naich     3867  3860  0 11:35 ?        00:00:01 sshd: naich@pts/0
naich     3868  3867  0 11:35 pts/0    00:00:01 -bash
naich     3984  3868  0 12:47 pts/0    00:00:00 sleep 600
naich     3986  3868  0 12:47 pts/0    00:00:00 ps -fu naich

“sleep” is a program that does nothing for the number of seconds you tell it.  The “&” at the end means run it in the background, like a daemon, rather than interactively.  Here you tell it to do nothing for 10 minutes and then then you get a list of the processes you are running.  See the one with PID 3984 (your pid will be different)?  That’s the sleeping one we are going to creep up on and kill.  Brutal.

naich@raspberrypi ~ $ kill 3984
[1]+  Terminated              sleep 600
naich@raspberrypi ~ $ ps -fu naich
UID        PID  PPID  C STIME TTY          TIME CMD
naich     3867  3860  0 11:35 ?        00:00:01 sshd: naich@pts/0
naich     3868  3867  0 11:35 pts/0    00:00:02 -bash
naich     3985  3868  0 12:51 pts/0    00:00:00 ps -fu naich
naich@raspberrypi ~ $

RIP 3984.  Poor thing never knew what hit it.  If you are killing it because it has locked up, then you might need to use a bit more force.  If politely asking it to die with kill doesn’t work, use kill -9 to guarantee you’ll finish it off.

12.3  Symbolic links

Symbolic links allow more than one filename to point to the same file or directory.  Similar to (and naturally predating) the Windows “shortcut”, they allow you to use a filename to point to another file or directory in a different place.  They come in two types – hard links and soft links.  A hard link creates a filename that refers to the physical location of the data.  It will appear as a normal file but shares the same data as the file it is linked to.  The more common type is a soft link, which appears as “linkname -> original_file” in long listings.  Example:

naich@raspberrypi ~ $ mkdir wibble
naich@raspberrypi ~ $ echo hello >wibble/linktest.txt
naich@raspberrypi ~ $ ln -s wibble/linktest.txt softlink
naich@raspberrypi ~ $ ls -l
total 4
lrwxrwxrwx 1 naich naich   19 Aug 24 14:22 softlink -> wibble/linktest.txt
drwxr-xr-x 2 naich naich 4096 Aug 24 14:21 wibble
naich@raspberrypi ~ $ cat softlink
hello
naich@raspberrypi ~ $ rm softlink
naich@raspberrypi ~ $ ls -l wibble/
total 4
-rw-r--r-- 1 naich naich 6 Aug 24 14:21 linktest.txt
naich@raspberrypi ~ $

First we make a directory called “wibble”, then create a file in it (linktest.txt) with some text in it.  ln -s wibble/linktest.txt softlink creates a soft link to “wibble/linktest.txt” called “softlink”.  We demonstrate that “softlink” can be used as a real file by outputting the contents with cat softlink.  Then we remove the softlink with rm softlink and show that the original file remains.

Softlinks to directories can cause all sorts of hilarious confusion if you get a bit lost:

naich@raspberrypi ~ $ ln -s / subdirectory
naich@raspberrypi ~ $ cd subdirectory/home/naich/subdirectory/home/naich
naich@raspberrypi ~/subdirectory/home/naich/subdirectory/home/naich $ pwd
/home/naich/subdirectory/home/naich/subdirectory/home/naich
naich@raspberrypi ~/subdirectory/home/naich/subdirectory/home/naich $

Eek!

 12.4  Everything else

Some other other useful things to know about.

There is no on switch or reset button on the Pi, so we use the “shutdown” command to reboot or halt.  Options are “-r” to reboot or “-h” to halt before turning it off.  You also specify a time to do it at, or “now” to do it immediately.

naich@raspberrypi ~ $ sudo shutdown -r now

Broadcast message from root@raspberrypi (pts/1) (Fri Aug 24 14:02:39 2012):
The system is going down for reboot NOW!
naich@raspberrypi ~ $

You can also use the commands halt to halt and reboot to wipe the SD card clean.  Nah, just kidding.  It reboots the Pi.

For file manipulation (stop sniggering at the back), the commands are mv (move), cp (copy), rm (remove), mkdir (make directory), rmdir (remove directory).  This page explains them in english.

Get information about the filesystem with the commands df and du.  df shows how full the filesystems are:

naich@raspberrypi ~ $ df -h
Filesystem      Size  Used Avail Use% Mounted on
rootfs          3.6G  1.4G  2.1G  41% /
/dev/root       3.6G  1.4G  2.1G  41% /
tmpfs            22M  208K   22M   1% /run
tmpfs           5.0M     0  5.0M   0% /run/lock
tmpfs            44M     0   44M   0% /tmp
tmpfs            10M     0   10M   0% /dev
tmpfs            44M     0   44M   0% /run/shm
/dev/mmcblk0p1   56M   34M   23M  61% /boot
/dev/sda1       7.5G  2.0G  5.6G  27% /mnt/downloads

du shows the amount of hard disk space used in a directory and all those under it:

naich@raspberrypi ~ $ du -h /etc
132K    /etc/console-setup
8.0K    /etc/rc4.d
8.0K    /etc/dpkg/origins
... and on and on ...
24K     /etc/gconf
3.8M    /etc
naich@raspberrypi ~ $

Finally, for the moment, check out uptime.  This shows how long it has been since the last reboot.  This is the geek equivalent of comparing penis size, so make sure you have at least a month’s worth of uptime before even mentioning it to anyone, let alone bragging about it.

naich@raspberrypi ~ $ uptime
 15:24:09 up  1:21,  2 users,  load average: 0.00, 0.01, 0.05
naich@raspberrypi ~ $

Yeah, an hour and 21 minutes is not going to impress the ladies.  In my defense, I did have to reboot to get a screenshot earlier.  And it’s very cold in here.

12.4  Further reading

A streaming pile of Pi

Continued from here.

First page here.

11. Setting up your uPNP media server

A uPNP media server allows you to stream videos from your Pi to any device that can talk to it.  A lot of tellies do this these days, along with PS3s, XBoxs, iPads, tablets and your PC.  With a server on your Pi, you can watch what you have downloaded on any compatible device in your house without the hassle of moving files or memory sticks about.  Let’s rock.

You could try doing an apt-cache search for “upnp server” if you want the practice in finding suitable packages, or I could tell you that the one you want is Mediatomb.  So sudo apt-get install mediatomb

naich@raspberrypi ~ $ sudo apt-get install mediatomb
Reading package lists... Done
Building dependency tree 
Reading state information... Done
The following package was automatically installed and is no longer required:
 mtools
Use 'apt-get autoremove' to remove it.
The following extra packages will be installed:
 javascript-common libavcodec53 libavformat53 libavutil51 libdirac-encoder0
 libexif12 libffmpegthumbnailer4 libgsm1 libjs-prototype libmozjs185-1.0
 libmp3lame0 libmysqlclient16 libnspr4 libnspr4-0d libschroedinger-1.0-0
 libspeex1 libswscale2 libtag1-vanilla libtag1c2a libtheora0 libva1 libvpx1
 libx264-123 libxvidcore4 mediatomb-common mediatomb-daemon mysql-common
 wwwconfig-common
Suggested packages:
 apache2 httpd speex mysql-client postgresql-client
The following NEW packages will be installed:
 javascript-common libavcodec53 libavformat53 libavutil51 libdirac-encoder0
 libexif12 libffmpegthumbnailer4 libgsm1 libjs-prototype libmozjs185-1.0
 libmp3lame0 libmysqlclient16 libnspr4 libnspr4-0d libschroedinger-1.0-0
 libspeex1 libswscale2 libtag1-vanilla libtag1c2a libtheora0 libva1 libvpx1
 libx264-123 libxvidcore4 mediatomb mediatomb-common mediatomb-daemon
 mysql-common wwwconfig-common
0 upgraded, 29 newly installed, 0 to remove and 0 not upgraded.
Need to get 11.4 MB of archives.
After this operation, 25.2 MB of additional disk space will be used.
Do you want to continue [Y/n]?

It’s the same as when you installed Transmission.  Apt tells you what it is going to install and you say Yes.  It nips off, installs everything and sets it up.  It doesn’t need much configuring either.  It’ll work straight away but we’ll make a little adjustment or two.  Or three if you own a Samsung TV.  Our Samsung TV could connect to the server OK but wouldn’t play the videos.  If you have the same problem, the fix for it is here.  Read what it says and add the lines to the config file after you have made the following changes:

The configuration file for Mediatomb is /etc/mediatomb/config.xml (note that it’s in /etc, as usual) and is a bit unusual in that it’s an XML file.  Let’s not pussyfoot around here.  XML is a horrible way to present data and to use it in a configuration file is a crime against humanity.  I could rant on for a while but I will spare you that – you have enough problems, being faced with a configuration file in XML format.  So, open it up with sudo nano /etc/mediatomb/config.xml and let’s get started.  As you can see, it’s nice and easy to read – if you are a robot…

<?xml version="1.0" encoding="UTF-8"?>
<config version="2" xmlns="http://mediatomb.cc/config/2" xmlns:xsi="http://www.$
     Read /usr/share/doc/mediatomb-common/README.gz section 6 for more
     information on creating and using config.xml configration files.
    -->
  <server>
    <ui enabled="yes" show-tooltips="yes">
      <accounts enabled="yes" session-timeout="30">
        <account user="mediatomb" password="mediatomb"/>
      </accounts>
    </ui>
    <name>MediaTomb</name>
... and so on ...

Straight away, you should see something that needs changing.  The user interface web page has a default username and password, which is bad.  Change that user=”mediatomb” password=”mediatomb” to something else.  Or, if you are feeling brave, you can change “accounts enabled” to “no” and you won’t have to log on at all. This is a bad idea if you want to access it from outside your home network.

On the line after “<server>” add <port>49152</port> this forces it to use that port rather than pick one of its own choosing.  Done that?  CTRL-X, [Y]es you want to save, return to save it over the top of the original.

I’ve set up a download of a config.xml file with all those changes applied to it.  Feel free to replace yours with it.  The username is “mediatomb”, password is “wibble”.  Please change them on your system.

A quick sudo service mediatomb restart and you are done with the setting up.  To use the web interface, point your browser at http://your_pi_ip:49152 , log in (if you have to) and you should see this:

or something like that anyway.  To get it to index your media, click on the “Filesystem” tab (next to “Database”), then the cross next to “mnt” (to expand that branch) and “downloads” to highlight it.  Over on the right, there will appear a swirly cross which says “Add as autoscan dir” when you hover over it.  Click on it to select that directory as one you want Mediatomb to scan.  Choose “Inotify” for Scan mode, “Basic” for Initial scan and check “Recursive”.  Click on “Set”, it will perform a basic scan and then when you click on the “Database” tab on the left, all your stuff should appear under the “Video” branch.  Documentation for the user interface is available for those who want to tinker.

And that’s it.  Your Pi should appear  as  a media server when your TV/PS3/whatever does a scan.  Any new downloads should appear automatically but be aware that if you swap the external storage, it might not be rescanned when you plug it back in, so you will have get Mediatomb to do it manually.

Put the kettle on, make a cup of tea and enjoy your videos.  That’s pretty much it for now.  There’s one more chapter of useful things to know about Linux.

Continued here.

Memory sticks and torrents

Continued from here.

First page here.

9. Thanks for the memories

For this chapter you’ll need a memory stick or a pre-formatted external hard drive with a USB connection.  As we are going to be putting videos on it, the larger the better.  Got one?  Good.  Stuff it up your Pi’s USB port.  There should be whirrings and flashings (subject to lights or motors being present) as something happens. If we were using Windows, the external storage would appear as a drive letter.  Linux, however, lets you choose where to make it appear.  Linux has a single directory tree under which external storage and internal storage is placed, or “mounted” in Linux terminology.  Remember when I said to change the “Download to: ” directory setting in Transmission to /mnt/downloads”?  That’s where we will be mounting your external storage.  You might have questions at this point, but let’s get your external storage mounted before we come to them. A while ago I was blethering on about how bad it was to be root and how it was a good idea that you couldn’t log in as root.  Yes, well, I was probably slightly exaggerating to reinforce a point.  Sometimes you have to do lots of stuff as root and all that sudoing starts getting boring.  You can make yourself root until you exit, by doing sudo -s.  Try it:

naich@raspberrypi ~ $ sudo -s
root@raspberrypi:/home/naich#

Notice a few things here – the “$” has changed to “‘#” to indicate you are now root, the “~” has changed to “/home/your_name because it is no longer your home directory and you are now “root@raspberrypi”.  You now have absolute power over the entire operating system.  Let it go to your head for a while, cackle like Emperor Palpatine and let the hate flow through you. I like to do this occasionally when I become root and I find it best get it out of my system before I do anything else.  Back to normal again?  Good. First we need to create the directory to mount the external storage on.  The mount location has to already exist in order to mount something on it.  Type in the commands in bold:

root@raspberrypi:/home/naich# cd /mnt
root@raspberrypi:/mnt# ls -l
total 0
root@raspberrypi:/mnt# mkdir downloads
root@raspberrypi:/mnt# ls -l
total 4
drwxr-xr-x 2 root root 4096 Aug 21 13:24 downloads
root@raspberrypi:/mnt#

You change your working directory to /mnt (this is traditionally where you mount things), see what is already there (nothing), create a directory called “downloads” with “mkdir” and then you list it. Quick aside here – see that “drwxr-xr-x” bit?  That shows you what sort of file it is (“d” means directory) and the permissions for it, showing who is allowed to do what to it.  Read the this page up to and including section 2.1.1to understand permissions or try and battle through my very short explanation here:

There are 3 lots of “rwx”s, the first for the owner of the file, the second for the specified group (it is the second “root” in the illustration above, shown here in italics) and the third is for “others”, i.e. everyone else who is not the owner or a member of the group.  In each “rwx”, “r” means “read”, “w” means “write” and “x” means “execute” if it is a program or “enter” if it is a directory.  A dash (“-“) means a lack of permission for that function, so in the above example, the first 3 letters after “d” (“rwx”) mean the owner (root) can “r”ead, “w”rite and “x”enter the directory.  A member of the “root” group (the next 3 letters) can “r”ead and “x”enter the directory but not “w”rite any files to it, as the “w” is missing.  The same “r-x” permissions apply to everyone else, as shown in the last 3 letters.

Now we need to find the external storage.  The Linux kernal (the core of the operating system) will have interrogated your external storage to find out what it was when you plugged it in, and then set it up as a block device, making it available in the /dev directory as if it were a file.  As it is, it is an interface that you can read and write to it but not in any way that is useful to you.  It is now up to you to mount that block device on the filesystem so you can treat it as a branch on the directory tree.  Have a look in /dev and you’ll see a whole load of files that are interfaces to devices.  One of those files is your external storage, but which one?  There are a few ways to find it, but the easiest is with the command fdisk -l:

root@raspberrypi:/mnt# fdisk -l

Disk /dev/mmcblk0: 3965 MB, 3965190144 bytes
4 heads, 16 sectors/track, 121008 cylinders, total 7744512 sectors
Units = sectors of 1 * 512 = 512 bytes
Sector size (logical/physical): 512 bytes / 512 bytes
I/O size (minimum/optimal): 512 bytes / 512 bytes
Disk identifier: 0x000714e9

        Device Boot      Start         End      Blocks   Id  System
/dev/mmcblk0p1            8192      122879       57344    c  W95 FAT32 (LBA)
/dev/mmcblk0p2          122880     7744511     3810816   83  Linux

Disk /dev/sda: 8019 MB, 8019509248 bytes
20 heads, 16 sectors/track, 48947 cylinders, total 15663104 sectors
Units = sectors of 1 * 512 = 512 bytes
Sector size (logical/physical): 512 bytes / 512 bytes
I/O size (minimum/optimal): 512 bytes / 512 bytes
Disk identifier: 0x665e2cdf

   Device Boot      Start         End      Blocks   Id  System
/dev/sda1   *          80    15663103     7831512    b  W95 FAT32
root@raspberrypi:/mnt#

There’s a lot of information there, but the important bits are where it says “Disk /dev/…”, showing the size of the hardware and the column under “Device” which shows the names of the block devices each partition has been assigned. “Disk /dev/mmcblk0” is the SD card – see how it is split into two partitions, one large (3810816 blocks, each block being 1K making it about 3.8GB) and one small (57344 blocks)?  The other “Disk” (it will probably be “/dev/sda”) is your external storage, with its single partition appearing as “/dev/sda<number>”.  In my case it’s “sda1 “and 8019 MB big – it’s an 8GB memory stick with its partition having 7831512 1K blocks.  Yours might have a different number – “sda4”, for example, in which case use that rather than “sda1”.  Now let’s mount the /dev/sda1 device to /mnt/downloads with mount /dev/sda1 /mnt/downloads:

root@raspberrypi:/mnt# mount /dev/sda1 /mnt/downloads
root@raspberrypi:/mnt# ls -l downloads
total 188
drwxr-xr-x 3 root root   4096 Jul 12 17:07 Acad Course
-rwxr-xr-x 1 root root 181574 Jul 12 16:44 Chamber Assembly.wmv
drwxr-xr-x 2 root root   4096 Aug 15 19:31 vids
root@raspberrypi:/mnt#

The contents of the memory stick may vary.  Note how the owner and group are “root”?  That is because it was root who mounted the device.  Now we know it works, we can make it so the drive is automatically mounted at boot time, writeable by the user “debian-transmission”, who runs the transmission-daemon program. We need to find out his user ID and group ID though – type id -u debian-transmission and make a note of the user ID:

root@raspberrypi:/mnt# id -u debian-transmission
106
root@raspberrypi:/mnt#

It’s 106 for me.  Then do the same for the group ID with id -g debian-transmission and make a note of that number – 109 for me. We need to unmount it before we remount it for real.  This is the equivalent of safely removing it – unwritten data will be flushed and no more can be sent to it.  The command is umount /mnt/downloads – that’s umount, not unmount.  If you are doing this as a normal user later on, remember to sudo the command.

root@raspberrypi:/mnt# umount /mnt/downloads/
root@raspberrypi:/mnt# ls -l downloads/
total 0
root@raspberrypi:/mnt#

Never remove a storage device without unmounting it first.  If you do, a boxing glove on a spring will shoot out of the top of your Pi and punch you in the nose.  Well, it should.  You can lose data and corrupt the file system by yanking it out without unmounting.  You might also be wondering what would happen to anything that was already in the /mnt/downloads directory when your device was mounted.  The contents are preserved but are not accessible while the device is mounted over the top of them.

Now let’s automate the mounting of the external storage.  At boot time the file /etc/fstab is read to see what needs to be mounted.  Edit that file now with nano /etc/fstab and you will see this:

proc            /proc           proc    defaults          0       0
/dev/mmcblk0p1  /boot           vfat    defaults          0       0
/dev/mmcblk0p2  /               ext4    defaults,noatime  0       0
# a swapfile is not a swap partition, so no using swapon|off from here on, use $

Any line starting with “#” is a comment for the benefit of humans and ignored by the computer.  This goes for most configuration files.  Have a guess at what the first two columns are.  If you are really keen, try reading the man page for fstab with man fstab. The first is the block device name, the second is where it is mounted, the third is what sort of filesystem it is and the fourth is options.   The other two are used for maintenance and can be left out or set to 0.  You will want to add this line at the end in order to automatically mount your external storage:

/dev/sda1       /mnt/downloads  auto    defaults,uid=106,gid=109  0       0

Replace the “uid=106” and “gid=109” with the numbers you found earlier for user ID and group ID.  Save and exit with CTRL-X and then answering “Y” and hit return to save it with the same file name. Now mount the drive with mount -a. This mounts all the devices in /etc/fstab in the same manner as if it was booting up. Finally, check everything is hunky-dory:

root@raspberrypi:/mnt# mount -a
root@raspberrypi:/mnt# ls -l total 4
drwxr-xr-x 4 debian-transmission debian-transmission 4096 Jan  1  1970 downloads

Smashing.  I should also point out that Linux distributions like Ubuntu do all this automatically, popping up a file manager window showing the contents of the memory stick as soon as it is plugged in.  But we are operating at a lower level than that.

Now stop being root by tying exit:

root@raspberrypi:/mnt# exit
exit
naich@raspberrypi ~ $

Now we are back to normal.  You can stop cackling.  Your Pi is set up to mount the memory stick whenever it boots, so you don’t need to do anything else other than remember to sudo umount /mnt/downloads if you take the stick out and sudo mount -a when you put it back in.

10. Torrent something!

Now open up the Transmission web interface by pointing your browser at http://your_pi_ip_address:9091 and click on the “Open” icon.  Put this URL for a perfectly legal video torent in it:

http://www.frostclick.com/torrents/video/animation/Big_Buck_Bunny_1080p_surround_frostclick.com_frostwire.com.torrent

Put it in the “URL” box and click open.  Magnet links also work in this box. If you have found a Magnet link from a perfectly respectable web site, right click and choose “copy link location” and paste it into the “URL” box in Transmission.  If you have downloaded the .torrent file, upload it to Transmission.

You can check on the status of the torrent by clicking on it and then clicking the “i” icon for more info on it.  I got a “unregistered torrent” error, but DHT found enough peers to get it all.

Sometimes, with a popular torrent with lots of fast peers, the poor little Pi can get a bit overwhelmed with all the traffic hammering its ports.  It’s like a DOS attack and can bring down the Pi if it is bad enough.  So I like to limit the number of connections by going to the web panel, opening up settings by clicking on the spanner, going to the “Peers” tab and setting a limit of 20 peers per torrent and 100 peers overall.  I also set speed limits of 400kB/s for up and downloads in the “Speed” tab.

If you are having trouble connecting to any peers, make sure that “Use port forwarding from my router” is checked in “Network” tab of the settings.  This page gives some more info about setting up your router.  If your internet connection is fast you should have a high definition video file on your memory stick before you know it.  I’ll leave you to find out more about how Transmission works by the age-old method of clicking things to see what happens.

Most tellies these days have USB ports on them which you can lob a stick into.  If yours does, unmount and lob your stick.  Our telly also has an ethernet port on it, for streaming video from a uPNP media server.  Wouldn’t it be good to have a uPNP video server on the Pi?  I think we could probably manage that in the next chapter.

Continued here…